Authentically Human! Not Written by AI!
All Content Copyright © Michael Chesley Johnson AIS PSA MPAC

Sunday, March 31, 2013

How to Use Your Umbrella for Plein Air Painting


Sometimes, beginning plein air painting students will wonder why my umbrella isn't set up to protect me from the sun.  I suppose I must look a little foolish standing in the intense Arizona sun when I have a perfectly good umbrella at hand!  But that's not what the umbrella is used for.  Instead, it's used to shade palette and canvas so you can make more accurate color and value judgements..  If you have both in sunlight, not only is that hard on the eyes, but it is difficult to decide if a mixture is rich enough or light enough.

However, there's another use for the umbrella – to shield the eyes.  When I paint someplace where the ground is very bright, such as a gravelly beach, I actually angle the umbrella down to block the light behind the easel.  It's also good for blocking bright sun bouncing off a creek.  This week, I painted down by Oak Creek, and I had both bright ground and a bright creek.  Angling the umbrella to block this light made all the difference in the experience.

Here's the painting I made that day.  If you're interested in purchasing it, it is currently up for auction at this link.


Hues of Spring, 9x12, pastel

Friday, March 29, 2013

Repost: How to Prepare for a Plein Air Workshop


Plein Air Workshop with Michael Chesley Johnson


I posted the below, I think, about three years ago.  I think it is worth reposting every year at the beginning of the plein air season.  (I believe, however, that the plein air season is year-round!)

I've been teaching outdoor painting workshops now for over ten years, and I've taught hundreds of students, from beginners to professionals.  Over the years, I've seen some of my students struggle in three areas:  gear setup, painting basics and drawing skills.  (The latter even among some professionals who are selling their work!)  If I could create a "sure-fire," one-day lesson that would teach these, and plan it for Monday, they would enjoy the five-day workshop so much more. 

Not knowing how to set up your gear is like taking the road test for your driver's license without having ever gotten into a car.  "I just got this easel and I've never set one up before" is a phrase that tells me a lot about the student.  Part of my workshop is, indeed, helping you fine-tune your gear so you can get into the field with a minimum of fuss, but learning how to use your easel before the workshop will save you much frustration.  Before you pack your bags and head for the airport, take out the easel and practice setting it up with all its accessories.

For a painter to know painting basics is like a chef having a set of good cutlery.   He needs good knives to prepare a meal efficiently.  Knowing, for example, how to hold a brush and what to mix for a cool green will let you get to the "meat" of plein air painting faster.  In my workshops, we learn skills unique to working outdoors.  Painting basics should be learned in an introductory studio class.  Even a one-day class and studying a book like Oil Painting for the Serious Beginner or Pastel Painting for the Serious Beginner will help.  I'll assist you, of course, but remember that painting outdoors adds another layer of complexity to an already complex craft.

We usually think of drawing skills in connection with portraits and architecture.  One might think they don't apply to the landscape, but they do.  Drawing is all about proportion, and there are plenty of places where proportion can go wrong in a landscape.  In my workshop, if your drawing is poor, I'll let you know.  But I'll also tell you there is no shortcut to getting better, except practice.  Drawing involves first learning to see relationships accurately - length and angle of line, amount and shape of curve - and then teaching your muscles to copy what you see.  I recommend carrying a small sketchbook and a 6B pencil and sharpener.  Draw at odd moments - in the doctor's office, while stopped in traffic, when taking a break during a long walk.  Draw anything, even if you don't love the subject.  Draw the dumpster, if that's all you can see.

Not everyone who has a desire to learn plein air painting has the time to learn so much before taking a workshop.  Sometimes, we just want to jump in and do it.  If you're like that, I appreciate your enthusiasm!  And if you can continue with that admirable spirit, you'll do well as a painter.  But if you can find time to prepare, you will have a much more rewarding experience.

(By the way, I've created an on-line course with a series of videos on "Plein Air Essentials" to give you a jump start on some of these issues.)

Thursday, March 28, 2013

More Ideas on Transporting Wet Panels


Update:  The Panel Pak is an excellent and very similar solution.  They come in a variety of sizes and are thinner and lighter than my home-made deal.

Lately, I've been trying to get a leaner look to my plein air gear.  This isn't out of vanity so much as it is out of a desire to hike into the field a little further.  With that in mind, I've replaced my old Victorian cast-iron tripod with a much lighter Sienna tripod that I can strap to my backpack.  I've also replaced my “all-in-one” pochade box in favor of a more distributed approach to the paint box.  Although the Sienna tripod can certainly hold the weight of the packed-to-the-gills “all-on-one,” the box is somewhat cumbersome to lift up onto the tripod.  So, rather than lug paint tubes, wet canvases and other knick-knacks in the pochade box, I've gone with the lighter Open Box M, which serves only as palette and panel holder.  Paint tubes I have moved to a separate plastic container.   For wet canvases, I have crafted a 9x12 two-panel holder that fits into the backpack with the Open Box M, paint tube box and my brush tube.  All told, my panel-holder, paint tube box and Open Box M are still lighter than the “all-in-one” box.  Now, I'm ready to hit the trail!

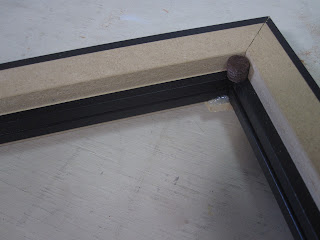
I wanted to share with you my two-panel holder.  It was a simple idea, and I have to credit my friend M.L. Coleman who showed me one he had made.  Basically, I bought two very cheap 9x12 frames on eBay – the moulding is flat on front – and used two wood screws to join them face-to-face.  Next, I stopped by Home Depot to get eight turnbuttons.   (Actually, my Home Depot had only “window screen clips,” but they work as well.)  I put four turnbuttons on each side.  Now, because the frames I bought have such a deep rabbet, I had to add spacers so the panels wouldn't rattle so much.  There was no danger of the panels falling out, but I just didn't want to hike with my backpack rattling.  Fear of attracting rattlesnakes, I guess.  So, I'm trying two different types of spacers – stacks of felt buttons on one side, and a set of small wood blocks on the other.  I'll let you know which works best.


Now, for those of you going to the 2nd Annual Plein Air Convention & Expo in a couple of weeks, here's a tip.  If they give you the same logo-stamped shoulder bag I got last year, you can use it to store this 9x12 two-panel holder – and it will also hold the Open Box M 10x12 panel storage unit!  Perfect size.


Monday, March 25, 2013

Product Review: The Palette Garage


I recently received a new product that my readers will find useful – the Palette Garage.  If you're wondering how to save the oil paint in your pochade box and keep it from drying out, this is for you!

The Palette Garage (www.palettegarage.com) is basically a strip of acrylic upon which you lay out your paints in preparation for painting.  Using either the included Velcro buttons or mini-clamps, you attach it to your palette.  (This could be the palette area in a pochade box or an actual, handheld palette.)   When you're done, you remove the Palette Garage and slip it into the acrylic storage tube.  The storage tube has a cap at each end with a small wick; the wicks are dampened with clove oil, and the fumes of the oil keep the paint from drying out.


The Palette Garage comes in several sizes – 12”, 14”, 16” and 18”.  For reviewing, I chose the shortest one – the 12” - since I wanted it to fit on the palette of my Open Box M.

I wasn't able to use the mini-clamps to attach the Palette Garage to my box, so I used the Velcro buttons.  I was a little afraid the adhesive on the buttons wouldn't hold, since my Open Box M palette is well-seasoned with oil.  But after rubbing the palette with a little OMS to clean off the surface oil, the buttons held well.


I use a basic six-color split-primary palette, and although I had plenty of room for my six colors (plus a seventh guest color, Torrit Grey), I didn't have room for the white.  I usually put out a lot of white on my palette.  This isn't a  problem for me, though, as I usually use up most of the white, anyway.  Once I started painting, it was easy to pull paint off the Palette Garage with my brush or knife; it was no different than working with my usual setup.


For cleanup, it was a snap to remove the Palette Garage and place it back in its container.  I cleaned off the leading edge of the acrylic strip so it wouldn't get paint on the inside of the tube.  Also, I had to clean up the paint a bit – I mix with brushes, so the paint always gets a little dirty – but found it tricky to do so.  The acrylic is slippery, so using a knife would remove some of the dirty paint but not all of it.  To get rid of the rest, I had to use a paper towel.  This required a little care, since I easily contaminated one pile of paint with another through my clumsiness.  Next time I'll use a Qtip, which should work much better.


I found the Palette Garage easy to use and it works as promised.  I painted out in the field and then let the paint stay “parked in the garage” over several days.  The paint stayed wet and workable.   However, as a frequent painter – I paint several times a week – I find it no trouble to clean my palette and refresh the paint daily.  I'm not really concerned about wasting paint.  But if I painted only once a week, I would definitely be concerned about my paint drying out.  The Palette Garage is a perfect way to keep paint fresh.

You can find out more about Palette Garage at the website, www.palettegarage.com.  Palette Garage is made by the same maker of Best Brella, a product I use all the time out in the field.  For more about Best Brella, visit www.bestbrella.com.  (I reviewed it in this blog in 2009.)

Saturday, March 23, 2013

Workshop Wrap-Up

Blue Waters, 12x9, oil
Currently Available at Auction!

Another Paint Sedona week has gone by.  We had exceptional weather this week - pleasantly warm, little wind and plenty of sunshine.  The plein air workshop painted at Red Rock Crossing, the Sedona Heritage Museum, the Thunder Mountain trailhead and near the Chuckwagon trailhead.  Students came from North Dakota, Massachusetts, Georgia and Michigan.  I even had a student from the Savannah College of Art and Design attend!  I thought I'd share a few photos from the week with you.  (I've made one of the demonstrations available for auction, above.  I do have other auctions running in my Daily Paintworks auctions .)

Sad to say, but I only have two workshop weeks left, and then we'll be heading east for the summer.   I have only two spots left in the week of April 9-12, so if you'd like to take advantage of the glorious weather, now's your chance!  You can sign up here.  Can't do it this spring?  I'll be back in the fall!  I already have my fall 2013 schedule online and will soon be adding winter/spring 2014 dates.

In my next few posts, I'll be writing about a new product I'm experimenting with, the Palette Garage.  Plus, I have a new way of carrying wet panels I want to share with you.  Stay tuned!

Oh - did you miss my last newsletter?  You can read it here.


Photo by Trina Stephenson


Friday, March 22, 2013

Sedona in Snow

It's rare that we see snow in Sedona, so when we have it, it's a great opportunity to get out and paint.  I love catching the play of sun and shadow on the snow among Sedona's red rocks.  A few weeks ago, I had this chance.  The snow is very short-lived, and for one of the paintings, the snow completely disappeared by lunchtime! (That was "Snow on Shiprock.")  For the others, the snow gradually dwindled down to just a hint.   Look at "Over There" to see how little was left by the end of the week.

By the way, despite the snow, it wasn't cold painting at all.  Once the storm cleared,  I was painting in 50-60 degree (F) temps.

I posted a couple of these paintings earlier, but now that they are dry, I am posting better images.  These are also now up for auction at my Daily Paintworks site.  Click on the link by each image to visit the auction. Auction starting bid for each is only $100!

Mitten Ridge Snow - 9x12, oil - Visit the Auction

Over There - 9x12, oil - Visit the Auction

Snow on Shiprock - 6x12, oil - Visit the Auction

Snowy Shadows - 12x9, oil - Visit the Auction


Friday, March 15, 2013

A Pastel Plein Air Week

Cross the Gully, 18x12, pastel

Occasionally, I get students clamoring for a workshop with a theme.  This past week, we did a “pastel-only” advanced workshop.  It was good to get out with those dusty old sticks.  They seemed to fit right in with the dusty warm weather we're having now – and with the dusty pollen.  The junipers are blooming, and even a slight breeze causes a small explosion of pollen.  (Note to self:  Don't set up easel right next to junipers again. *Sniff*)

We got some good painting in.  The day I set up next to a particularly pollenaceous juniper, I was able to make a really good start on a vertical 18x12 piece.  I usually work much smaller in pastel – 9x12 or less – so I enjoyed having a little more time to work on something bigger.  (The workshop was a paint-along, so we all painted together.)  After about two hours, the shadows changed significantly and I moved on to another project.  But it didn't take more than another hour in the studio to finish this one off.  (See above.)

I also did a study – starting with a grey block-in that I washed in with alcohol – of one of my favorite hills.  The greys helped a great deal in capturing the sense of distance for this one.

Evening Glow, 9x12, pastel

I also did a couple of small studies of some short-lived effects – snow in the hills and water in ordinarily dry Dry Creek.  (It's hard to believe that last week we had snow, and this week we have temperatures hitting 80.)  Dry Creek was rushing with beautiful, golden water, water that was colored with the Sedona dirt.  Thunder Mountain had some little scraps of snow left in the cliff shadows.

Snow in Shadow, 5x7 pastel

Three Rocks, 6x9, pastel

These pieces are all available for auction at my Daily Paintworks page.

Sunday, March 10, 2013

Starting with Greys, Again


Secret Mountain Study, 9x12 oil/paper

If you've been following my blog, you'll remember that I have been experimenting with starting my plein air paintings with a grey block-in.  The reasons, as I've explained before, are two-fold.  First, starting with grey allows you to focus on the value structure of your scene without getting mired down in color-mixing.   (Establishing the values is, as you know, key in capturing a moment of time.)  Second, the greys will naturally "mute" the intense colors of the split-primary palette.

For awhile, I'd been using Gamblin's Chromatic Black for mixing my greys.  But then I realized I have all these tubes of "Torrit Grey" from Gamblin sitting around.  What is this? you may ask  Here are a few paragraphs from the Gamblin website to explain:
Every spring, Gamblin Artists Colors collects a wealth of pigments from our Torit® Air Filtration system. We filter the air around the areas where we handle dry pigments so that our workers are not exposed to pigment dust. Rather than sending any of our high quality, expensive pigments into the landfill, Gamblin paint makers recycle them into "Gamblin Torrit Grey". 
"Pigment dust should not go into the earth, water or landfill, but into paint," says Robert Gamblin. 
The mix of pigments is different every year, so Torrit Grey is always unique and will never be repeated. Torrit Grey tends to have a greenish tinge because of the great strength of the Phthalo Green pigment, which is a dark bluish green. Torrit Grey varies from a medium dove grey to a dark earthy grey.
You can read the full story here.

Torrit Grey is given away free with a purchase of Gamblin products at your local art supply store.  I think I got some from my online orders, as well.  I have several tubes of it - what better use for it than these grey block-ins?

The tubes I have are dark enough for my darkest darks.  From this, I mix three lighter vales, and then use the four values for my block-in.  If I need a dark accent, I can turn to my Chromatic Black (lightened a bit, of course, and usually with cadmium red for a nice warm note.)

Above is a demonstration I did of one of Sedona's local formations.  I left a good deal of the grey showing so you can see how nicely it works in the piece.

Friday, March 8, 2013

Varnish, Revisted


March must be my month for varnishing paintings, because a year ago this month, I wrote here about varnishing.

Well, I'm varnishing again.

Recently, I received a bottle of Gamvar from Gamblin.  Gamvar is no longer, except by special order, available in its previous, concentrated form.  Today, you can buy it conveniently premixed with Gamsol and ready to go as a final varnish.

I was excited to try the new Gamvar, because I have gotten tired of the spray cans of varnish I've been using.  Once, the spray nozzle got so clogged I couldn't clean it even by soaking it in OMS, and had to throw away a nearly full can.  Also, nozzles are notorious for spitting and applying varnish unevenly.

Gamvar requires a brush, and that, of course, requires cleaning, too.  But I find cleaning a brush less onerous than trying to clean a clogged nozzle or to get it spraying evenly.  Also, less solvent goes into the air, which means fewer toxic fumes.

Gamvar has another benefit.  It can also be used as a retouch varnish upon diluting one part Gamvar with five parts Gamsol.  This is a real plus, in my mind.  I don't have to keep a bottle of retouch varnish handy as well as a bottle of finish varnish.  When I'm varnishing, I can bring out all my paintings at once - those needing retouch, and those needing a final varnish.  I don't have to split them up into two separate batches.

One important note.  If you plan to do more work on the painting, Scott Gellatly, Product Manager of Gamblin, recommends that you use an "oiling out" procedure rather than use Gamvar as a retouch varnish.  The reason for this is that the Gamvar is designed to be easily removed with OMS.  Any paint applied on top of the Gamvar will also be removed when removing the varnish.  If your purpose in applying retouch is to bring up the color for further work on the painting, you should "oil out" instead of using Gamvar.  Here's the procedure, from the Gamblin web site:

  • Apply a liberal coating of 1:1 Galkyd Painting Medium and Gamsol Odorless Mineral Spirits to a dry painting. This can be applied to the entire painting or just to the area that needs to be enlivened.
  • Allow the medium to be absorbed into the painting for approximately two minutes.
  • Wipe off the excess painting medium with a soft, lint-free cloth.
  • Continue painting.

If the purpose is just to protect the painting while waiting for the final varnish, you'll have no problem with using the Gamvar as retouch.

Gamvar is a great solution for the busy painter.  Now if I can just find a way to keep the dog hair out of the varnish.

I have to confess that I've always varnished my paintings reluctantly, mostly because of the bother.   But because I paint on a fairly absorbent surface, varnish is vital.  Although the plein air pieces look really good when they are glossy and wet, once dry, they die.  The darks lighten, reducing contrast, and the colors become duller.  Varnishing does wonders - the paintings truly come back to life.

Here's a painting that is unvarnished on the left half but has had Gamvar applied to the right.  The arrow marks the line between them.


Tuesday, March 5, 2013

Monjeau Peak, Revisited


Here's the "after":

"October, Monjeau Peak" 12x16, pastel - 2013

and here's the "before":

"October, Monjeau Peak" 12x16, pastel - 2003
And now here's the story behind this metamorphosis....


One of my favorite spots in all of southern New Mexico is Monjeau Peak, high in the White Mountain Wilderness near Ruidoso.   Access is by a twisty, windy dirt road that goes uphill steeply to a stone lookout tower built by the Civilian Conservation Corps in the 1930s.  The lookout is at 9500 feet, and from here you have sweeping views of aspen-dotted alpine meadows and 12,000-foot Sierra Blanca.  Many beautiful trails wander over the meadows and beyond.

I should perhaps use past tense in the above paragraph. In July 2012, the lightning-sparked Little Bear Fire burned over 44,000 acres and 254 buildings.  The lookout tower was burned, but the structure remains and will be rebuilt; I believe Monjeau Peak is still closed at this time.


We camped there one fall ten years ago, in a little aspen grove.  While hiking, I became enamoured of the rock boulders that were scattered around.  They made fascinating, beautiful compositions with the fall colors.  I felt compelled to paint them.


I did a studio piece in pastel, which at the time I was very proud of.  I had it framed - quite expensively.  Not long after that, in a workshop with Albert Handell, I had an opportunity to share a slide of the piece with Albert and the group at our critique night.  When the slide flashed up on the wall, Albert exclaimed, "Oy, those rocks!' and suggested that I spend a year painting rocks.  (Which I did.)

As I got better at the craft of painting, I became increasingly dissatisfied with this piece.  Even so, I've dragged the painting around from home to home over the years, and I've kept it hanging on the wall for students and visitors to see.  Why?  For the silly reason that it cost so much to frame.  I suppose I could have replaced the pastel with a newer one, but I had it in my mind that there was something fundamentally good about the piece, and that someday I would "fix it."

There were a number of problems with it.  For one, the mountain in the distance seemed to end abruptly behind a big fir tree; it should have continued on.  For another, the rocks were all evenly-lit, and there was no real focal point among them.  And of course, the rocks themselves, in all their pink-and-purple glory, needed to be pulled back from Cartoonland to reality.

This week, ten years later, I decided to deal with it.  I love pastel because the surface is always "open."  That is, you can go back to work on it at any time without having to treat it in any way.  (With oil, the surface becomes "closed" after a few days, and you either have to "oil out" or use retouch varnish, neither of which is really very satisfactory.)  I unframed it, taped it to a board, found the very same photo I had used originally, and went to work.

I'm much happier with the piece now, and it will go back into its frame later today.

Here are some detail shots, plus one of the painting in its frame:


Sunday, March 3, 2013

Setting Priorities

9x12 Sketch of Oak Creek - SOLD

If you like the painting above, check out the others in my 

I just put out an announcement on my personal Facebook page that if friends want to contact me, they should do so by e-mail or phone.  Why?  Because I have reset my priorities and will be spending much less time on Facebook.  Facebook was stealing time away from more productive and satisfying activities.  (I won't go into "Facebook envy," but yes, that is part of it, too.)

For me, life is most satisfying when I create.  Facebook, like most social media, is not a tool for creation.  The clue is in the word "social."  Facebook is for networking and keeping up to date with friends and family.  But in my mind, creation is best done in solitude and without distraction.  Imagine if God had had Facebook.  Would the world have been created in just seven days?  I doubt it.

I, like many working artists, had the false hope that Facebook would help me make sales and earn students.  After several years on it, this has yet to happen.  I know many artists, and not a one of them has told me Facebook has helped them professionally.  Better for me with both of these tasks is my blog and my website.  From now on, I'll use Facebook just as a place for announcements.  You'll see my blog posts show up there, as well as other interesting news, but I will no longer be "liking," "unliking" or commenting on the picture of your latest painting or poodle.

Don't get me wrong.  I'm not giving up on friends and family.  I cherish my time with them, and I may still engage with them on Facebook in a limited way.  But time spent there with friends and family is not quality time.  And even though I am a very disciplined person, Facebook simply offers too many distractions that take me farther away from the people I love.

As a self-employed artist who wears three hats - painter, instructor, writer - setting professional priorities can be tough. Mine now are:

  • To improve my blog and web site so they are better tools for education and for selling my work; 
  • To spend more time on larger paintings for shows and awards; and 
  • To become a better painter by improving areas where I am weak and challenging myself where I am strong

And, oh yes, and probably write another book this year.  Who's got time for Facebook?