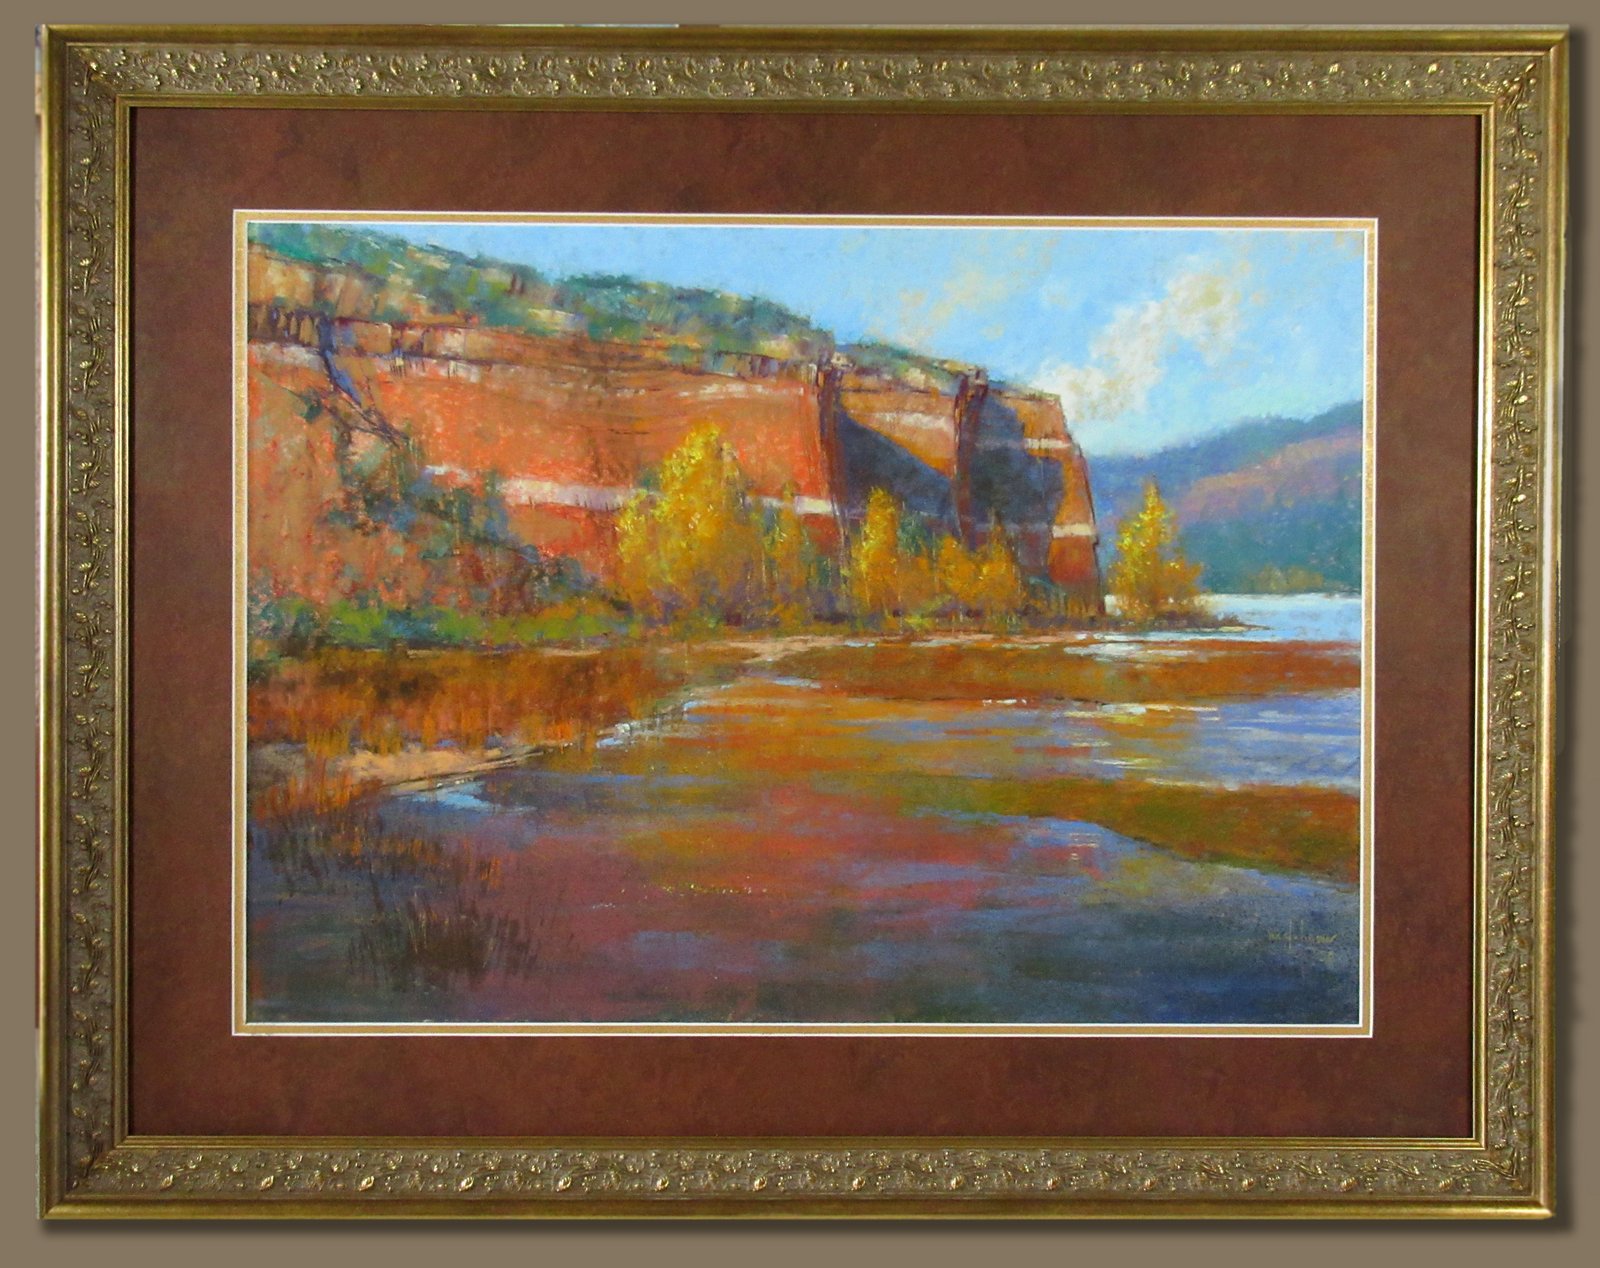
Not long ago, I visited a framer friend who was in the midst of moving his shop. "Want any of this stuff?" he asked, waving his hand over an assortment of matboards, museum glass pieces and frames—items he had cut or built for customers that never made it out the door and that he didn't want to move. Among this miscellany was a beautiful large frame with a double-mat and museum glass, just waiting for a suitable pastel painting. I took what I could fit in the car and also this frame. I figured, some day, I'd paint a pastel for it.
That was about a year ago. I came across the frame in my studio recently and, having some time, decided the moment had come. I embarked on painting "Autumn Splendor," a 20x28 pastel. I thought I'd share step-by-step photos I took of it while painting.
The first thing I had to do was mount the paper. I most often paint on UArt, which has an unfortunate tendency to curl. It's a powerful curl that doesn't want to lay down flat, even with tape. For this painting, I needed nearly a full sheet, and I knew there'd be a lot of potential energy in its curl that, were it to suddenly transform into kinetic energy, would be ruinous for a pastel painting. Luckily, I had large sheets of foam board as well as just enough heat-activated BEVA 371 film to mount it. If you don't do a lot of large pastels, you probably don't have much need for a hot mounting press. I don't, as I usually work in smaller formats that don't snap into a curl so easily. But I was able to mount my large sheet quickly with Trina's clothes iron set on "delicate." (BEVA requires a 150-degree heat source to activate the adhesive.) I don't have photos of the mounting process—I was too busy playing Twister with iron and impending curl—but if you follow the directions that come with the film, it does go smoothly.
(I wrote about BEVA film in an article for The Artist's Magazine with regards to mounting a finished oil-on-paper painting. You can read it here. )
With that in mind, here are the step-by-step photos plus captions to show you what I did.
Line drawing done with a hard, brown NuPastel. Starting to block in with softer pastels. (I have a large box in the studio of miscellaneous pastels, so I'm not sure of the brand. Later I will use Blue Earth Pastels for finish work.) I am working from photo references and plein air field sketches.
Continuing to block in my "best guess" at color.
A scary stage! I use a 2" housepainting foam brush to apply Gamsol to liquefy the pastel which both fixes the pigment and also helps cover up the white paper. I encourage the drips and runs, as it gives energy to this underpainting.
Close-up of drips and runs. A friend says these look like "ghost trees."
Starting to apply the next layer of pastel. I re-state the drawing of the cliff with very dark brown pastels.
Defining the cottonwood trees better against the cliff, and adding more form to the lake foreground.
Adding more color. Also, I punch up the contrast around that cottonwood to the right of the cliff by increasing the value of distant, sunlit water. Also working on modelling the form of the cliff.
More refinements...
...and even more refinements.
Finished painting in that nice frame I got from my framer friend.
Over the years, I've painted many times at Grand Canyon National Park as an invited artist for the Grand Canyon Conservancy's Celebration of Art. I've put together a page on my website with some of the more recent ones that you might enjoy. These are all beautifully framed, and shipping to the US and Canada is included in the price. You can see (and buy!) them here:
The collage above will give you a faint idea of what the paintings are like. I encourage you to go to the link above to see the paintings in a much larger format.
Each of these paintings has a story, and if you buy one, I'll be happy to share the story with you!
Yes, we do get snow here in the mountains of New Mexico, and even though it's been sunny and warm (50 degrees yesterday), some of the snow remains. Unlike back east, where one has plenty of humidity to wrap the warmth around into the shadows to melt it, here there's not so much of that, and little of the warmth we've had affects the snow there. This means I'm able to get out and paint snow while wearing a thin coat and no gloves.
In my last post, I showed you my plein air pastel kit from Blue Earth. This time, I want to show you my plein air oil kit from Guerrilla Painter. I've had this little 6x8 thumb box for a long time, and I like to pull it out of my closet when I want to paint as simply as possible in oil. Although it's called a "thumb box"--and you can certainly stick your thumb in it and balance it on one arm--I find it too heavy for that to be comfortable. I prefer to either sit with it in my lap or perch it atop a tripod. This week, I used the tripod.
My thumb box is an older model and has a hinged front
piece; the one on the Guerrilla Painter web site is a little different.
My set up is really quite portable: tripod, a lean roll of paper towels with two brushes stuck into it for transport, and in my thumb box, a "Mighty Mite" container for Gamsol, a tube of Gamblin's Titanium-Zinc White and a tube of their Galkyd Gel, plus a small painting knife. I prep the palette before I go out with just three colors plus white (Gamblin's Hansa Yellow Light, Naphthol Red and Ultramarine Blue.) And that's it! Oh, and sunglasses for all the light bouncing off the snow.
I've included in this post two paintings I made this week in the snow.
Snow Melting 6x8 Pastel - Available
Painted with the Nomad from Blue Earth Pastels
If you've been following my blog, you'll know that I'm a big fan of Blue Earth Pastels. Recently, I acquired a prototype of a plein air kit they've developed called the Nomad. Opening the little box was like a breath of fresh air: 56 chunky sticks of pristine, pure pigments, all neatly packed in a box just a little bigger than a 6"x8" sheet of pastel paper. I couldn't wait to take the Nomad on a short journey—but alas, one of New Mexico's bigger snow storms hit about the same time I received it, so I had to wait several days.
The Nomad
The pastel sticks, which are packed in Blue Earth's signature fashion of each standing upright in a comfortable cushion of foam, make a good selection for outdoor painting. On the left side are 28 sticks that cover the primary and secondary colors in four steps of value. On the right side are another 28 sticks, all greyed versions of the sticks on the left, and again, in four steps of value. Together, these two sets give the painter a wide range of possibilities for color and value.
The box itself is made of 200-lb cardboard, which means that the lid is sturdy enough to serve as a backboard for painting on. With a set of four micro-clips, you can clip a sheet of 6"x8" paper to the inside of it and paint directly on it. (Blue Earth recommends using another piece of paper for cushioning to keep the corrugation from "telegraphing" through to the painting surface, but I didn't have that problem.) And even better, you can fit that same sheet of paper between the lid and the foam inserts that protect the top of the pastels when you pack everything up.
In the field with the Nomad
Once I got plowed out, I took the kit to paint some snow scenes. I tucked a few sheets of 6"x8" paper (Art Spectrum, UArt and Wallis Belgian Mist) into the box, and stuck the micro-clips, a few sheets of paper towel and set of fingercots into my pocket. I also took a folding stool, since I figured my favorite rocks for sitting on were covered in a foot of snow. I didn't pack any glassine to protect the painting surfaces; I decided the fit of the 6"x8" sheets was tight enough that if I just stacked them, front to back, they wouldn't shift enough to smear the pastel.
For storing paper or paintings, I keep the foam inserts on top...
...then I put in my painting(s)...
...and top them off with a clean sheet.
If you've used Blue Earth pastels, you'll know that they are soft. Although you can certainly draw a delicate line with them, that's a little difficult in a small format such as 6"x8". So I took a painterly approach, thinking more in shapes and color, saving any lines for just a touch here and there, which I can do with a pointed end or a long edge of a stick. This, by the way, is how I go about doing color studies in the field, and I think this kit is excellent for that. Another thought is, if you want to do a more "finished" painting—and what that is, exactly, is a topic for another post—take out a larger sheet of paper on a bigger backboard. Or, take a few sticks of hard pastels or a pastel pencil. But in my mind, that defeats the idea behind this extremely portable pastel kit. The less you take, the better—and you'll have a more enjoyable time of it.
The Nomad is expected to be released March 1st and will be available exclusively through Dakota Pastel.
Here are two more sketches from the field with the Nomad:
You know, years ago, I had the idea of "Art for Patronage." Well, actually, the idea is centuries old, but I thought if I created a web site and had a community of painters join it, we might be able to find patrons to give us things in exchange for artwork. For example, a week's lodging in a gorgeously scenic place in exchange for a painting of that view. Or a meal at a restaurant in exchange for a handful of sketches. Maybe even a studio exchange between two painters. You get the idea.
And now we have Patreon.
Patreon is a bit different, as you will see if you look at my Patreon page and those of other artists. Rather than barter, it's a pay-for-reward plan. How much you pay each month determines what "reward" you get. Everybody is different, and I have set up my reward "tiers" to reflect what makes sense to me, based on what my collectors, students and general admirers have desired in the past.
Early last summer, I went to Scotland for the second time as a painter. I took my little gouache kit, which made me very happy. It permitted me to sit on a rock with my watercolor journal in my lap and to work unencumbered by tripod, turps can and the like. If I had to choose an analogy, I would say it was like flying the way one flies nimbly in a dream, like Peter Pan.
Our painting group spent over a week on Isle of Skye. One of my favorite painting spots was in Sligachan, just at the foot of the Cuillins. Two beautiful stone bridges with arches cross the River Sligachan, which wasn't much of a river when we were there, just a trickle over tumbled rocks. The Sligachan Hotel, a white edifice that looks like it has withstood many a Skye winter, promised an escape from the elements, and we enjoyed nice lunches after painting in the brisk June weather. We went twice to paint—once, when we had spitting rain and much wind, and a second time, when we had fleeting sun with clouds that whirled around the peaks of the Cuillins. It proved to be a moody place, which is perfect for my idea of Scotland.
My gouache kit, on-location at Sligachan
Painting beneath the "new" bridge - the bridge
I feature in the painting is in the distance
(Photo by Marion Boddy-Evans)
After I returned to America, I decided I wanted to take my little gouache sketches and make something big. I finally decided on a view of the larger of the two bridges in Sligachan and to treat it as a picturesque landscape, where there is little indication of man and much of raw nature. (If you aren't familiar with terms like the sublime, the picturesque and the pastoral, I refer you to this article.) After looking at some of my photographs while thinking of a design, I knew I would have to take some liberties with the topography—but then, that's where being an artist gives you a certain god-like power.
I had two large canvases available; one which was square, and the other, rectangular. Rectangular is always more suitable for a vista, which was my intent. Then I got out my newsprint and charcoal and made a number of sketches in the same 2:3 format as my 24x36 canvas. I always have trouble choosing a design among so many qualified candidates, so I put it to a vote in social media. I ended up combining a couple of the top choices. Then, I toned my canvas with Gamblin's transparent earth red—a warm, rich, orange hue—and laid in my final design with compressed charcoal on the canvas (coarse cotton) and sprayed it with fixative afterward.
Then I got busy with the painting. I quickly brushed in the general color and values with paint thinned with Gamsol. Gamblin's Portland Greys were a big help with this muted scene. I next worked on painting the bridge. The bridge is the center of interest, and I wanted to get the drawing right. Built in the 1820s, the bridge uses three arches to span the river, and the bottom of each arch is supported by a pier. The piers, I found, were problematic. They are reinforced with angular sections that jut out into the flow. Since the scale of the bridge in the painting is small, I eventually omitted these angular bits, as they caused the bridge to look more complex than I wanted, calling too much attention. Also, although perspective does exaggerate the rise and fall of the bridge as it crosses the stream, I exaggerated it further for effect.
The foreground I painted almost entirely with a knife. I wanted the crisp edges and strong contrasts that one finds in such a nearby sunny patch. Elsewhere, I did use a knife—one needs to use it everywhere in order to keep the painting unified—but sparingly. For the first time, I also used Gamblin's Neo Megilp medium. One of my favorite words describes this medium: thixotropic. That is, it is a gel that become fluid when stirred or shaken. The medium, which is a modern non-toxic replacement for the old, poisonous Maroger medium, keeps the paint workable for several hours and dries to a satiny gloss. I used it freely in this painting, thinning the paint almost to a glaze in some areas, or keeping it thick and impasto-like in others.
Although the painting focuses on the bridge, I've left spots of light in the gloomy distance to carry the eye around. This required a little adjusting and re-adjusting; at one point, I had so many spots of light things were a bit busy. But with a knife, I was able to make adjustments easily.
I thought I'd include images of a few of the preliminary design sketches and steps of the painting process here. I've got another retreat to Scotland scheduled for 2020. I'll definitely visit Sligachan again.
Some design sketches. "B" was the favorite in my poll.
Larger versions of "B"--or am I changing my mind?
Charcoal on 24x30 canvas, pre-toned with
Gamblin's transparent earth red
Step 1
Step 2
Step 3
Step 4
Step 5
Step 6
After this step, I decided I had too many sunspots in the distance,
and the light on the rim of the cloud was too obvious
a path for the eye.
If you've been following my blog, you'll know that once or twice a year I host a painting retreat in some beautiful place. So, get ready—I am scheduling retreats for Maine, Nova Scotia and Scotland!
Just as reminder, I always give my students first chance at the painting retreats. If you've not taken a workshop with me yet but would like to join me on these retreats, I invite you to check out my workshops page. Once students have had their chance, I occasionally open up the retreat to other experienced painters. Retreats usually fill very quickly, so make sure you let me know which retreat interests you, and I will send you information once I finalize details.
How does a painting retreat work? It's just as it sounds—it's a painting retreat for artists who want to get away from the daily grind to paint with some like-minded folk and nurture friendships. (For the best group dynamics, we prefer to have painters only.) Mornings start off with breakfast and critiques, followed by an organized morning where I lead you to some fantastic locations. Usually, the rest of the day is more free-form, with artists going off on their own or together to paint more or explore the area. If there are local artists, galleries or museums, I try to arrange a visit. There's always a kitchen, so we can make communal meals. Also, we are early-to-bed and early-to-rise to make the most of the daylight. Participants always tell me again and again how much they enjoy these retreats.
With that in mind, here are the upcoming retreats. Please note that the Maine retreat is this year, and the Nova Scotia and Scotland retreats are for 2020.
Maine, Lubec. August 11-16, 2019
I call Lubec the "quiet end" of Maine. Beautiful, with bold cliffs, stunning views, old boats and fish buildings, it is quiet even in August, when only two hours west Bar Harbor is jam-packed with tourists. (I think the lobster tastes better in Lubec, too!) We did this retreat last year, and it was a great success, with everyone staying at a beautifully-renovated US Coast Guard campus. Details have been finalized for this retreat, and I am already taking deposits. For full details, please download the brochure here.
Price: $300. Not included: lodging, meals. (See brochure for lodging details.)
Painting Lubec, Maine
Lunenburg Area, Nova Scotia. June, 2020
We did this retreat a couple of years ago, and we were very pleased to discover that there are many quiet nooks for the painter. Lunenburg is close to famous Peggy's Cove, where one can paint old boats and fish buildings, but there are other, equally beautiful spots the tourists haven't yet discovered. I'll gladly share these with you on retreat! I haven't finalized dates or lodging for this one yet, but it will be on Nova Scotia's South Shore, about an hour from Halifax. You can read about the last retreat in Nova Scotia here.
Price: $700 USD is what it cost last time, and 2020 will be about the same. Includes lodging, breakfasts.
Painting Peggy's Cove, Nova Scotia
Isle of Skye, Scotland. June 13-20, 2020
We had such a great time last June painting around the Isle of Skye that we couldn't wait to go back! With that in mind, I have already secured lodging and have lined up two wonderful local artists to serve as our guides and drivers. We'll be based in scenic Portree and from there venture to locations such as Sligachan, with views of the Black Cuillins, and historic Eilean Donan Castle. There may also be an opportunity to extend the trip to other locations (at shared additional cost) on either end of the week. I like to consider this retreat to be more of a sketching trip—you'll want to bring only your sketching materials and not the full plein air setup. You can read about the last retreat in Scotland here.
Price: $1500 USD. Includes lodging, breakfasts, and transportation for painting trips.
Special note: This retreat is limited to only THREE participants due to lodging and transportation restrictions.
Painting Isle of Skye
Sligachan
If you're a past student, I hope you'll join us, and if you're not, I hope you'll take a workshop with me so you can enjoy one of these adventures!


