Authentically Human! Not Written by AI!
All Content Copyright © Michael Chesley Johnson AIS PSNM
Showing posts with label From the Mailbag. Show all posts

Thursday, December 26, 2013

From the Mailbag: Pinning Pastel Paper to a Board

Pastel on paper showing the white margin left after removing artist's tape.
I used an alcohol wash to "fix" the block-in.

A reader writes:   I am fairly new to pastels, having painted with them for a little over a year.  Sometimes I do not use tape to hold my paper to the easel, but use push pins to pin them to cork board.  At my stage, this seems to work, and I'd like your opinion about the flaws of this method.  Also, since some of the paper edges become "dirty" with pastel dust, yesterday I used a black permanent magic marker to create a uniform border around each piece of sanded paper. I believe the look is preferred and very clean. Can using this type of marker do any damage to the picture? Eventually this border would be covered by a mat or frame.

First, permanent Magic Marker or Sharpie isn't permanent.  It's permanent only in the sense that it won't wash off with water; it will, however, fade quickly over time.  (The Sharpie website says 3-4 months if exposed outdoors; a few years if kept indoors.)  You say you will be covering the border with a mat or frame, so it sounds like this isn't an issue for you.  However, the chemicals found in the dye-based ink may not be acid-free and could cause damage to the mat or pastel paper over time.

Rather than using a Magic Marker to darken the messy border, I would suggest using an archival material.  Pastel makes the most sense, since you can blend it in with the edge of the painting more readily than any other material.  You could use another matte medium, such as gouache.  But if the border will be covered by a mat or frame, who cares?  It's only an issue if you "float" the painting.

Likewise with the holes created by pushpins.  The pins should be located within the 1/4" border that will be covered by the mat or frame.  The only issue I've had with pushpins is when I do a water-based wash such as with acrylic, watercolor or diluted alcohol which will make the paper buckle.  The pushpins create stress points that emphasize the buckling.

To solve the problem, I recommend using artist's tape to tape a border all the way around the paper and to fasten it to a backboard.  When you're done, just carefully peel off the tape - and, presto!  A beautifully clean border.  This even works if you do a wash for your block-in.  If you firmly seal the tape at the edges, the liquid won't leak under the tape, or not much.

A little leak at the corner.  If I'd pressed the tape down more firmly,
it wouldn't have leaked.  But, the mat covers it - so who cares?

Monday, September 30, 2013

Toning the Canvas

Canvas toned a mid-value, warmish grey with oil paint.  The paint
used was leftover paint on my palette, mixed together to get this flavor.
I used a small brush and intentionally left the strokes showing.

A reader asks:  "Please discuss painting on a colored ground, both pastel and oils.  For oils, do you feel comfortable using acrylic as an underpaint for oils?  What colors would you choose and why?"

I'll answer the second question first.  I think acrylics work just fine for toning the canvas - if they are applied thinly and as a wash.  Too thick, and the oil paint you apply next may not adhere well enough to last the ages.  "Too thick" is if you can see an obvious glossy appearance to the acrylic.  If you want to use thicker acrylic, consider using an acrylic gesso (also called "acrylic dispersion ground") that has been toned.  Acrylic gesso has been formulated to provide the right tooth and absorbency to serve as a substrate for oil paint; regular acrylic paint has not.  The safest bet, however, is to tone your canvas with oil paint.  I like to use a paint that dries relatively quickly, such as raw umber.  By the way, for pastel surfaces, acrylic is a great medium to use for toning.

Before answering the other question, I should note that the point of toning the canvas (or paper, in the case of pastel), is threefold.  First, it gives the whole process of painting a jumpstart.  If  you have trouble beginning a painting , throwing some paint on the canvas and scrubbing it in with a paper towel is a great way to get going.  Second, it kills the white and establishes a darker value.  This not only makes the canvas easier on the eyes, but it also gives you a value to judge your mixtures (or pastel choices) against.  It's almost impossible to judge the value of any given color against white; every mixture just looks dark!   Third, your color choice will affect the overall color harmony of the finished painting and will help to unify the piece.

I generally try to choose a color that will enhance the mood I'm shooting for.  As a landscape painter, on a sunny day I may choose a warm color to give the painting an overall warm feeling; on an overcast or foggy day, I may choose a cool color.  Or, I may choose a complementary color to liven up the color scheme.  It's a common trick among plein air painters to start with a red tone to make a scene that is predominantly green more interesting.  If you don't completely cover up and obliterate the initial tone - and you shouldn't - some of the red will pop through the greens, adding sparkle.  Sometimes, I'll start a painting with a mid-value, neutral grey, as pictured at the top of this post.  This is the most helpful in making accurate color and value choices.

Finally, you should have fun with the toning!  You don't have to stick with one color or value.  You can have warm passages mixed in with cool passages, light areas mixed in with darker ones.  Sometimes a "randomized" underpainting will give you fascinating results.

Wednesday, February 20, 2013

From the Mailbag: Luminous Water

Oak Creek Ripples, 12x9 pastel
Available at Auction!

A reader writes:  I entered a juried pastel show recently and saw a pastel painting that interested me.  It was a  painting of rapid water flow, as one would see during a spring run-off of water over boulders and small rocks in a stream. What interested me about the painting was the luminosity of the water. On close inspection, I could not detect anything, but perhaps was it an acrylic overlaying the pastels that represented the water?

Having not seen that particular painting, I can't speak to it.  I can, however, speak to the luminosity of water in general.  The illusion of luminosity has to do with contrast - but not just value contrast.  You need to consider temperature contrast, as well.

In my painting above, the water sparkles and seems to glow from within.  Part of it does have to do with value.  The sun "diamonds" on the water are the lightest value in the painting.  I made sure that I kept that in mind and keyed down all the other values in the piece.  If you look at the sun diamonds and compare them to the value of the water, you'll note that the water is significantly darker.

Additionally, note the water itself and the colors within it.  I've varied the color from blue-green to red-orange.  These are not only color complements, but they are temperature complements, too.  The red-orange reads much warmer than the blue-green, leading to a luminous quality.  (The French Impressionists discovered this principle.)  By the way, the orange color is due to sunlight reflecting off the creek bottom - not an uncommon sight in the "Red Rock Country" of Sedona, Arizona!

In case you're interested, this little pastel painting is available at auction at my Daily Paintworks store.  The auction ends in only a few days!  Click here for the auction.

Tuesday, January 29, 2013

From the Mailbag: How to Practice Painting


A reader writes: What would you recommend as a clear way of practicing painting? There seem to be many avenues to go down all at once - choosing a subject, drawing, value, color, composition, brush strokes, etc. Thousands of decisions to be made. So far I read, read, read, take workshops, classes, paint often and still I feel daunted and commit "errors of enthusiasm" most every time. 

Indeed, learning to become a better painter can be daunting!  Where does one start?  I like to attack the learning process the same way I do a lunch buffet - in an organized manner.  I get my plate first, then my utensils, and I move on to the salad, appetizers and the main course, followed by dessert. Sometimes, I'll try juggling my dinner plate, salad bowl, bread plate and dessert plate all at once, and that always ends up being a mistake.  It's better if I make several trips.

So what would my steps be, if I were just starting off?

Well, my reader has laid out the process quite nicely in his question.  Start with learning how to draw, followed by learning how to compose, followed by a study of color usage and finally, brush work or mark-making.  Break up the steps over time, and spend a significant part of your education working on each step.  Make sure you feel your skills have gotten good enough at each step before moving on.  (Most art instruction books have all the basics, and you can use them as a program of study.)

But where does one go from there?  I think this is what my reader is really asking.

The problem is juggling all those plates.  When trying to create a finished painting, most students juggle too much.  They try to do everything at once, such as thinking of brush work at the same time they're puzzling out how to mix color and also redrawing a tree limb.  This is a method doomed to frustration.  You're much better off by painting in the same orderly manner in which you learned to paint:

  • Get your plates and utensils (make small sketches to work out values and composition)
  • Get your salad (get the drawing right)
  • Get your entree (get the color right)
  • And lastly, get your dessert (add those deft, finishing brush strokes)

You also must be satisfied with your work at the end of each step.  If you're not happy with your drawing, don't move on to color.  Get the drawing right first.  If you're not happy with your color, don't move on to finishing strokes.  Get the color right first.

Finally, I must say this:  Painting is a craft.  A craft, no matter whether it is painting, woodworking or even juggling, requires practice.  The more you do, the more you learn, and the better you get.

I can help you with this process, by the way.  At both my winter Paint Sedona workshops and summer Paint Campobello workshops, I break everything down into these easy steps.  I still have a few spots left in the Paint Sedona plein air painting workshops and am now taking deposits on the Paint Campobello plein air painting workshops.

Friday, January 18, 2013

From the Mailbag: Making the Complex Simple

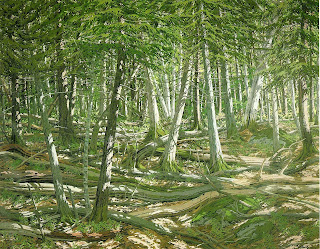
"Old Windfall" by Neil Welliver

A reader writes:  "When I look out at the world it seems complex.  How do I simplify it in a painting without losing touch with its complexity?"

I often find my eye pulled toward the natural world's wonderful complexity.  There's something infinitely pleasing about, for example, the baroque intricacy of a woodlot.  Tangled brambles, interlocked branches, and the play of little spots of light and shadow form a visual playground.

But as attractive as such a scene is, is it a suitable subject for a painting?  Well, that depends on your goal.  If your goal is to convey the complexity, then yes.  But with what method and materials will you accomplish your task?  In my mind, you will be working with many, many small shapes.  If you flatten the scene to analyze it - that is, if you close one eye to eliminate the third dimension and then squint to simply and consider the scene as a collection of shapes - you'll see an infinitude of tiny polygons.  The precise relationship of each polygon to its neighbor is crucial to creating the sense of overlapping vines and limbs.

This kind of precision means drawing.  So, I would consider a drawing medium such as pencil, charcoal or pastel to be an obvious choice.  But what about paint?  You can use that, too, but it's still going to require careful drawing.

Of course, you will still have to initially simplify the scene.  You'll need to take infinity and break it down to a handful of large, simple shapes.  Again, if you squint, you can simplify the scene and see these big shapes.  With a particularly dense woodlot, you may have mostly dark big shapes and a few tiny light shapes.  (Light has a hard time penetrating a thick stand of trees.)  Start with that, and then open your eyes slowly and begin to break the big shapes down into smaller ones.

All that said, this task is almost impossible to accomplish in a plein air painting.  In a dense woodlot, the passage of the sun seems to have a greater impact than it does in, say, an open field.  Those little spots of light seem to move along the branches much faster that you'd expect.   You are better off doing a quick color sketch to get the color notes, a value sketch to get a handle on values, and then take photos for all the details.  Then, head for the studio where you can work on recreating the complexity at your leisure.

Personally, I find this kind of complexity enchanting, but I don't have the stamina for it.  But some painters excelled at this kind of thing - the Maine painter Neil Welliver comes to mind.  At the top of this post, you can see and example of his work.  It would be a good exercise to look at "Old Windfall" and see, if you were to recreate this scene on your own, how you would start to simplify it.

Monday, January 14, 2013

From the Mailbag: Stand or Sit?

"Monet's Bench" by Gary Lee Price
(I call it "Claude in Chains")
I don't know if Monet sat; this may just be the
sculptor's interpretation.


A reader asks:  "Could  you discuss the merits of standing versus sitting?  I carry a three-legged stool.  I notice from your photos that you and others stand at your easels."

Most painters I know stand while painting.  The idea is two-fold.  First, you can put your whole body into each brush stroke; second, you can more easily take several steps back to view your work in progress.  When we sit, we tend to make smaller and smaller strokes as we hunch over our work, and we lose perspective of what the "big picture" looks like.  This can lead to fussiness in the work.  (It can also lead to fussiness in the artist when the muscles start to cramp.)

I usually stand.
Photo by John H. Burrow.

If you're doing smaller work, sitting is certainly an option.  You may not have to back off from your work as much, and you may be using smaller strokes that don't require anything more than some deft wrist action.

I have to confess, I sit about half the time.  If I am painting all day, I usually stand for the first half of the day and then may opt to sit the second half - it's easier on the back.  I recommend that you do whatever is comfortable so long as you are still doing your best work.  Question:  What do you do?

"Artists Sketching in the White Mountains" by Winslow Homer
Homer painted these three artists sitting.

Saturday, December 22, 2012

From the Mailbag: Brushes


Recently, a reader asked what brushes I use.  If you look through the art supply catalogs, you'll see an overwhelming variety of brushes used for oil painting.  You can get rounds, flats, filberts, riggers, fan brushes and even brushes tailored to create little marks that look like leaves.  You can get them made of synthetic fiber or natural fiber such as sable, hog, squirrel and possibly even catamount.  You can get them with long handles, short handles and also very short handles that will fit into your pochade box.  There are almost as many choices for brushes as there are for paint colors.

Well, I like to keep things simple.  I use natural hog bristle flats, period.  The flat is incredibly versatile.  With it, I can make wide strokes, thin strokes and dots.  I can scrub on paint vigorously, or I can let off the gas a bit and make delicate, twig-like strokes.  As the flat wears down to more of a filbert shape, I can make very soft, blended passages.  Also, the natural hair seems to have a more gentle "spring" and fits my style of painting better than the "snappier" synthetics.

For painting outdoors in a 12x16 format or smaller, I use sizes 2 through 10.  I don't go for the short brushes or the long brushes - the short ones are too short for my style, and the long ones are harder to control when painting in a small format.  To keep my load light, sometimes I'll only take out a couple of brushes.  For a 9x12, I may use only two flats - a size 6 and a size 8.

Although there are many fine brands out there, I've settled on Silver Brush's "Grand Prix" line.

Yes, I do have a rigger or signature brush and a few sables.  If the painting has dried so much that I can't scrape my signature in with the end of the brush handle, I'll use a rigger to paint my signature.  If I'm in the studio using glazes, I'll use the sables, which won't damage possibly soft paint layers.  I don't carry either of these into the field, though.

By the way, in my online Udemy course, I have a video lesson on how I handle my brush.  I should also mention that you get the full Udemy course as part of my upcoming Artist's Network University online course, which starts January 8.  This is a four-week course in which you get weekly assignments plus personal critiques from me.  Click here for the Artists Network University course.

Tuesday, December 18, 2012

From the Mailbag: Wearing Gloves


A reader asked recently if I wear gloves when using pastel.  I don't.  The reason is that I use fairly small pieces of pastel, especially in the finishing stages of the painting, and the glove tips of my index finger  and thumb tend to get caught between the pastel and the painting surface.  (I use large but form-fitting nitrile gloves, as seen in the photo above.)  Instead, I'll use a product like "Gloves in a Bottle," "Magic Gloves" or some other barrier cream to keep the pastel out of my skin.  It also helps with clean-up in the end.  Problem is, more often than not I forget to use it!  I found that my local Ace Hardware has small bottles of "Gloves in a Bottle" at the checkout counter.

However, when working in oil, I always wear the gloves.  It's more for ease of clean-up than for dealing with toxicity, but it helps with that, too.

I've found I can usually use one pair of gloves over several painting sessions - at least two, typically three and sometimes more.

By the way, if you're looking for a Christmas present idea - for yourself or another artist - please consider my Paint Sedona and Paint Campobello plein air workshops.  You can even have a customized workshop!  All you'll need is yourself and three others, and I'll tailor the week any way you want.

Friday, December 7, 2012

From the Mailbag: Painting Large on a 9x12 Guerrilla Box


Someone asked recently if you can paint in a larger format on Judson's 9x12 Guerrilla Painter Box.  You can!  I regularly paint 12x16 on my box by using the telescoping easel kit.   Since it's hard to describe how this works, I thought I'd show a few pictures.

The mast has a little hook at the top that holds the top of the panel.  The bottom of the panel rests in a little metal bracket, which itself hooks onto the two built-in brackets in the lid.  I also use a heavy-duty knob on the lid,which allows me to give the knob a little extra twist to really secure it.

The mast and the bracket are all part of the telescoping adapter kit.

Although the mast will accommodate a larger panel, I stop at 12x16 - you are still working with only a 9x12 palette, and I like to have a larger palette if I go bigger than 12x16.  (You can, of course, get a palette extension kit that will expand even that.)

Top of the mast

Mast telescopes with a pressure clamp; see the large,
replacement knob on the left of the box lid

The bottom of your panel rests in this bracket

Monday, December 3, 2012

From the Mailbag: Paint Brands

Storm Over Bear Mountain, 5x7 oil - $75

A reader writes:  Do you feel that Gamblin oil paints are definitely better than Grumbacher Pre-tested ? Have you ever used M. Graham walnut oil paints, and if so, what did you think of them ? I see that you prefer not to use mediums – do you feel that paint not diluted with mediums provides more saturated, rich color ? Thank you for your time, and inspiration. - Name Withheld

Thanks so much for your note.  You know, the brand of oil paint one uses is really a personal preference.    I know artists who swear by Grumbacher, and others, by Gamblin.  In some ways, it's like Honda v. Subaru.  (I've had both, and currently drive a Subaru.)  Both are economical, efficient and well-made cars, and I'd trust either one of them in a snowstorm.   I use Gamblin because the way the paint handles suits me.  But I also have Grumbacher on my shelf, and Richeson Shiva, Rembrandt, Da Vinci and more.

As for M. Graham, that's like comparing a front-wheel drive car to one that's rear-wheel drive.   There really is a difference.  Graham paints are made with walnut oil, which dries more slowly than linseed oil paints.  As an outdoor painter who travels a lot and needs his paint to dry quickly, I don't use them.  (But that's my only reason; they are perfectly fine paints.)  With Graham, I could certainly use the Graham alkyd medium, but I understand that just makes the paint dry about as fast as linseed oil paint.  Or, I could use another alkyd medium (Gamblin's Galkyd Lite) that would make it dry even faster, but I prefer not to use any medium in the field.  It's just one more thing to take.

And that brings me to your question of mediums.  Oil paint, according to the consultants I've spoken to, is best used right out of the tube with as little thinner or medium as possible.  Oil paint should be prepared in a way so that it has just enough oil to be workable and create a durable paint film.  In the rare case that I run across a paint that's not workable, then I may use a medium to make it "move" better.  I only add a drop or two.  I sometimes find pure titanium white paint needs a little extra push.  If I do need my paintings to dry more quickly because I'm in a plein air festival, I'll use a little Galkyd Lite.