Authentically Human! Not Written by AI!
All Content Copyright © Michael Chesley Johnson AIS PSA MPAC

Monday, June 19, 2017

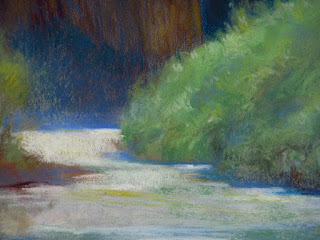
Going from Oil Field Sketch to Studio Pastel

Passage 24x18 pastel
by Michael Chesley Johnson

The other day, I wrote about taking a pastel sketch made in the field and using it as a reference for a studio oil painting.  This time, I want to address the reverse.  Earlier this spring, I painted several small oil sketches at Zion National Park in Utah at a retreat I organized for some painters.  One of the sketches really appealed to me, as I thought the moment it captured would make a stunning piece if painted much larger.  The oil sketch was only 9x6 inches; my plan was to make it 24x18, and to do it in pastel.

Oil field study, 9x6

I felt the sketch would translate fairly easily into a larger size without the need for photo references for detail.  So, I propped up the painting next to my easel and got to work.  After the block in, and once I began to adjust color relationships, the "detail" began to appear automatically—all without my having to refer to a photo.  Sometimes, the painting tells you what it needs, and also my experience in painting this kind of scene came into play.

I made the painting on a sheet of steel-grey Canson Mi-Teintes.  For my pastels, I used NuPastels for 90% of the painting and then finished with Unisons.  Because the Canson paper can only hold so much pastel, I used a little Lascaux fixative now and then to give the paper more "grip."  Also, I used it more heavily wherever I needed to darken a passage.  At the end, I used the sharp edge of a dark blue pastel to add three small ravens over the central cliff to help with the sense of scale.  Here are some detail shots:


I painted the original small field sketch because I'd fallen in love with the shadowy blue that you see as you look down the length of the Virgin River in the early morning.  I think I was able to preserve this beautiful blue in the larger pastel.

I put together a short video that shows some of the process, below.  For those of you receiving this post via e-mail, you can see the video at this link

Thursday, June 15, 2017

Going from Pastel Field Sketch to Studio Oil


The June 2017 of The Artist's Magazine features my article on greens for the oil painter ("Going Green(s): Tubed and Mixed").  In the article, I show an oil demonstration in which I use just about every green from Gamblin I could lay my hands on—and that's a lot of greens!  The demonstration is based on a pastel plein air sketch I made while in Scotland a year ago.  The article shows the oil painting but not the pastel reference, so I thought it might be instructive for everyone to see both side by side.

Gamblin Greens

When I work in the studio from a field reference, I often switch media.  If I painted the reference in oil, I may do a studio version in pastel, and vice versa.  I'll also scale up the work.  The pastel reference in this case is 9x12, whereas the finished oil painting is 12x16.

Here are the two paintings in a larger size:

Pastel Field Sketch 9x12

"Highlands Cottage" 12x16  Studio Oil

(Both the sketch and the studio oil are for sale, either together or separately.  Please let me know if you are interested.)

I rarely try to make an exact copy of the reference, and you can see some differences, though subtle, between these two paintings.  My primary goal was in using as many tubed greens as I could without mixing to maintain the purity of the color.  My secondary goal was to make a few adjustments with scale, value and intensity of color.  You'll note that in the studio oil, the distant shadows are lighter in value, which helps with the sense of depth; the rich browns in the foreground have been eliminated so that the eye pays more attention to the mountains and not to the stream; and the cottage has been reduced in size to make the mountains more impressive.

It's always dangerous to show a photo of the actual scene—we painters always make changes to it, whether we mean to or not—but I thought that might also be helpful.  What we change is the subject of a future post.

Location photo:

Near Glencoe, Scotland


Tuesday, June 13, 2017

Giant of the Valley: A Commission

"Giant of the Valley"
12x24 oil by Michael Chesley Johnson

I lived among the rolling hills and farms of Vermont's Champlain Valley for many years.  Back in those days, I was a runner, and I enjoyed a variety of scenery in every town I ran through:  Shoreham's apple orchards, Weybridge's dairy farms, Panton's rocky lake shore, the Charlotte ferry landing.  One particular run I liked was up Mount Philo, also in Charlotte, because at the top there is a grand view of Lake Champlain and New York's Adirondack Mountains in the distance.  With my heart and lungs working hard, especially on a humid summer's morning, it was refreshing to sit at the overlook for a few minutes to get a long view of that fruitful valley.

So you can imagine my excitement when, after all those years, I was asked to paint that view.  Well, not that view specifically, as I was asked to paint a picture of the Adirondacks; but I was given latitude to choose my viewpoint, and I chose the view from Mount Philo.  For the painting, I decided to make the centerpiece one of the Adirondack 46 High Peaks:  Giant of the Valley, which is number 12 at 4627 feet.  (Yes, I've hiked to the top.)  It towers over Lake Champlain and the farmlands of the valley.  I decided on a moody day, with dappled sunlight racing across the fields.

This painting was made on 12x24 cradled hardboard; it has a one-inch cradle and is designed to be hung without a frame.  I toned the panel first with Gamblin's Transparent Earth Red, which imparts a nice warm tone to a painting that has mostly cool colors.  You can see the different stages in the painting below.

Studio Setup

Underpainting

Working the sky, mountains and lake

Working the valley

Edge treatment
Finished painting

By the way, this is a second commission of this scene.  I originally painted an 8x24 version of it, which I liked very much, but I wanted to create in a format that would give me a little more opportunity to play with the foreground.  Here is the 8x24 version, which features a red-tailed hawk.

"From a High Place" 8x24 oil by Michael Chesley Johnson


Cool Place Painting Workshops Starting Soon!

If you're anywhere but in Lubec, Maine, you're probably experiencing record heat this week.  Well, it is pleasant here in Downeast Maine right now.  Maybe you'd like to get away from the heat and come to a cool place for a painting workshop.  My workshops here run July through August, and I still have a few spots left.  I hope you'll think of joining us.  For details, please visit www.PleinAirPaintingMaine.com

Tuesday, June 6, 2017

Thinking Ahead to Fall and Winter: New Program for New Mexico

You will still have red rocks to paint in New Mexico!

Right now, most people in the northern hemisphere are looking forward to the long, warm days of summer.  On Campobello Island, the lilacs have just started to bloom and the lupines are showing the first hint of color.  Soon I'll be able to hike out to Liberty Point without a fleece jacket and enjoy a warm breeze off the Bay of Fundy.  Before long, there'll be barbecue picnics, strawberry shortcake and parades for Canada Day.

But at the moment, I'm thinking about my fall and winter season out west.  I have some news to share that affects my Paint Sedona program.   Trina and I have sold our winter home in Arizona and moved to New Mexico.  Although I'll be teaching a few plein air painting workshops in Sedona, I've created a new program for New Mexico.  (Read on for details toward the end of this letter.)

El Morro National Monument

I'm sure this comes as a surprise.  I enjoyed almost a decade of sharing my knowledge of Sedona and painting with nearly 200 students in my small-size workshops.  But for a number of reasons, the time had come to move on.

The area in New Mexico to which we've moved lies between the Zuni Pueblo and El Morro National Monument, south of Gallup in the western part of the state.  It's an area Trina and I lived in when we first went west almost 20 years ago, and it is a place very dear to our hearts.  It's along the "Ancient Way," which is the route that was traveled by the Spanish Conquistadors and, before them, the Zuni and Acoma puebloans.  There are lava fields and volcanoes and ice caves to explore; ponderosa forests to wander through; and the beautiful sunshine and clean air of the high desert to enjoy.

View from a hill top toward the Ancient Way

Now, about my new workshop program.  "Paint the Southwest" (www.PaintTheSouthwest.com) will be based out of our home and studio.  This will be an intense, one-on-one, private workshop.  You'll get a private bed and bath, three meals a day, and all my attention.  We'll paint in the mornings, either in the studio or in the field; and afternoons will be filled with assignments or more time painting with me.  I will customize this program to your needs, and I'll give you as much help as I can to bring your painting to the next level.

I am very excited about this program for experienced painters because it will give me the opportunity to share my deeper knowledge about painting, something that is rarely possible in my all-level, group workshops.  Plus, I'll  be able to share my love of this part of New Mexico. I hope you will consider joining us.   For full details on the program, please visit the website at www.PaintTheSouthwest.com.

But as I said, I still have workshops in Sedona where you can paint beautiful Red Rock Country:

October 22-28, 2017:  Special mentoring workshop with Albert Handell www.alberthandell.com
October 30-November 3, 2017: Special workshop with Doug Dawson www.dougdawsonartist.com
November 14-17, 2017:  Paint Sedona workshop with me www.paintthesouthwest.com

I hope I'll see you either in Arizona or New Mexico!