 |
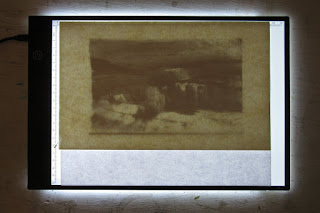
| The light box - ready to go. |
Recently, a follower asked if I'd paint a same-size copy of one of the gouache sketches from my afternoon hikes into the canyon. I find making copies difficult. A certain excitement comes with creating the original, whereas toiling over a copy presents a more mechanical task. Still, it can be challenging. The buyer has certain expectations in that the copy should be neither a lesser version of the original nor an improvement upon it. (Improvement is often in the eye of the beholder; the buyer may disagree with my changes, so I try to restrain myself if I find a spot that could use improvement.)
I normally decline requests to make a copy. However, this request came because I didn't want to sell and cut pages out of my journal. So, I considered it a reasonable one.
But another aspect of making a copy challenged me: What would be the best way to transfer the design?
There are many ways to make a copy, one of which is to draw the design free-hand. But no matter how careful I am, a free-hand transfer often creates disappointing errors. (I always warn that the copy will not be exact.) Another, more accurate option is to use a grid for the transfer—cumbersome, but it works. Then I remembered that Trina had recently acquired a light box for her fabric projects. Since the piece would be small—just 5x8”—I decided to give it a try.
Yet I did sense this would present other challenges. Don't get me wrong—I welcome technical challenges, and if I learn something, all the better. So I forged ahead.
A light box works by transmitting light through the object to be copied to the material the design is to be traced on. I had two problems here. First, the original had been done on 300 gsm (grams per square meter) watercolor paper. Would it be too thick to transmit sufficient light? Also, there was a second sketch on the back of the journal page. This would add a confusing underlay to the sketch to be copied. What's more, the design was going to be traced on a piece of paper of the same weight. Usually, one uses translucent tracing paper, which weighs in around 40 gsm. The sheet of watercolor paper I planned to use, however, was nearly 8 times heavier, at 300 gsm, I didn't think it possible for light to pass through two layers of this paper.
And how would I get that one journal page onto the light box, anyway?
My solution:
- Scan the original (by laying it on my flat-bed scanner)
- Convert the scanned image to a high-contrast, black-and-white version (with GIMP)
- Print this out in the same size as the original (by creating a document in Open Office, dragging the image into it and resizing it to 5x8”)
- Place it on the light box and atop it lay my blank 300 gsm watercolor sheet, and
- Hope that the light from the box would be strong enough to penetrate it so I could see the design well enough to trace it (with a #2 pencil.)
The project ended up working well. The light box is an inexpensive one: “LED Drawing Tracing Pad”, model A4-DWT from Shenzhen Youpinchung Technology Co, Ltd. It's big enough to fit an A4 sheet, the dimensions of which are 8.3 x 11.7" or 210x297mm. Here's a link to it on Amazon.
Below are some images to show how this all works, plus steps in painting the copy.
 |
| The original 5x8 gouache sketch |
 |
| Black-and-white, high-contrast image |
 |
| Black-and-white, high-contrast print on the light box |
 |
| A sheet of 300 gsm watercolor paper laid over the print I used a #2 pencil to trace very lightly over this. |
 |
| This and the following images show the copy being made, step by step. |
 |
| The finished 5x8 gouache copy |
 |
| The original sketch again |


