Authentically Human! Not Written by AI!
All Content Copyright © Michael Chesley Johnson AIS PSA MPAC

Saturday, January 30, 2010

The Magic Bandsaw - Cropping

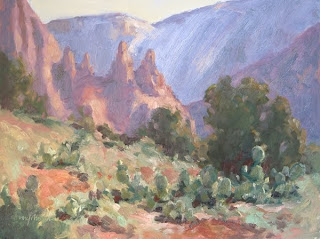
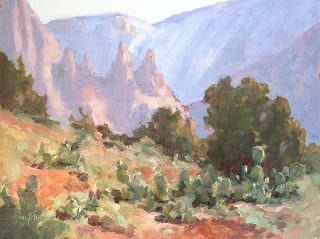
Here are a couple of paintings I really like:


Maybe you've already guessed from the color harmonies and other clues that they are from the same painting. When I painted the original, a 9x12, I was over-ambitious. Here it is:

I really loved that clump of prickly pears, and I really loved those rocks in the distance. The result of loving all parts of the scene a little too much can be the classic "Two Paintings In One" mistake. When my students do this and we get to the critique session, I don't say a word but pull out a couple of pieces of mat board and do some impromptu cropping. Their faces light up at once. Even I'm amazed at the great compositions the students made - once I put the cropping tools to their work.

Of course, for this blog post I used Photoshop, my "magic bandsaw," to do some virtual cropping. And you would need a bandsaw on this hardboard panel! It's a lot better to plan the composition in advance so you don't have to run out to Home Depot. (Or, maybe I could charge my buyer twice as much, since he'd be getting two paintings in one.)

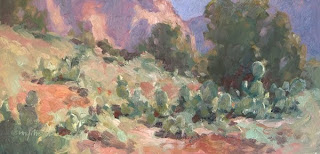
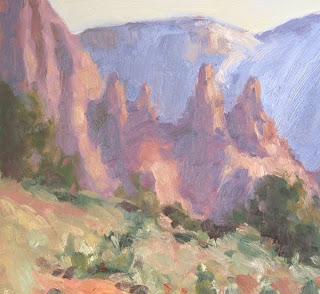
The painting is much-improved with the cropping. In the first image, the distant rocks are the focus; in the second, the clump of prickly pears. In each case, I've approximated the "rule of thirds" to position my center of interest. I could analyze each of these more for you, but I think you get the point: Measure twice, cut once.

Footnote. Another solution is to pull some of the attention from the background by reducing contrast and cooling color in the background and then increasing contrast and warming the color in the foreground. It's easier to do in the field right from the start than to do it in Photoshop! But here is the Photoshopped correction, which puts the emphasis on the foreground:

Friday, January 29, 2010

Cottonwoods

"Crescent Ranch Overlook" 9x12, oil - contact Michael

As many of you know by now, the "landing pad" overlooking Crescent Moon Ranch and Red Rock Crossing gives fantastic views in many directions. I can't get enough of the view, and it is different every time I'm up there. This is one I did a few weeks ago. The cottonwoods fill the valley between the hills. I can't wait for them to start budding. It'll be a task to capture the subtle grey-greens.

For this one, I tried to keep the foreground rock shadows darker and warmer in color than the distant cliffs. And although there was a good bit of rubble on the "landing pad" at my feet, I had to keep it subtle so it wouldn't draw too much attention. So, you'll see just a few strokes here and there of close value. For the cottonwoods below the precipice I was standing on, I also kept those soft - except for a few scratches with the brush handle to indicate trunks and limbs. Yes, I scratched right down to the white gesso ground and just left them. It can be a very effective way to signify that sort of feature.

Thursday, January 28, 2010

New Studio


It's not every day an artist gets to put together a new studio. Yesterday, I finished doing exactly that. As most of you know, we recently purchased a home near Sedona. The house itself is still undergoing renovations, but while old carpet was flying and new tiles were being cut in the other rooms, I sequestered myself in my studio to get organized. Trina, who is overseeing the renovations while I paint, teach my workshops and work on a couple of magazine articles, very nicely made sure that my studio got the overhaul first, so it was ready for me. New lights, new shelves, a new door plus a Solatube for some really nice light got me going.

Most of the stuff you see in the photos was in storage in New Mexico for three and a half years. It was like Christmas, opening up all those boxes. It was also nice to work by music from CDs that were also in storage. Neil Young got most of the air time. I actually got to the point yesterday where I started gessoeing some panels. Progress!

I want to leave you with a painting I did the other day of the creek near our house. This is Spring Creek, which feeds into Oak Creek. The creek has a couple of good painting spots with pools and small waterfalls. Some of the pools create what I'd call a staircase - one pool dropping into another pool and that into another pool, and so on. For this one, I positioned myself at the bottom of the staircase by one particularly nice rush of water.

"Spring Creek Pool" 9x12, oil - contact Michael

Wednesday, January 27, 2010

Mid-Winter Letter from Michael

"Overlooking Crescent Moon Ranch" 9x12, oil

27 January 2010

Sedona, Arizona

It's hard to believe that it's already February and that our stay in Sedona is more than a third over. We've had some truly beautiful weather this time around. Most days have been sunny and warm, but even the rainy or snowy days gave me some great material to work with. If you've been following my blog (http://mchesleyjohnson.blogspot.com) you'll have seen many of these paintings. The blog, by the way, archives all of these images for you, so if you haven't seen them, you can easily find them. I've been painting a great deal this winter, so perhaps you'll find something you'll enjoy. I've also posted some recent photos of the area here: http://picasaweb.google.com/mcj.painter/SedonaWinter2010.

I recently delivered some new paintings to Windrush Gallery here in Sedona. These include a 36x48 piece featuring the Cockscomb and Doe Mesa as well as a number of nicely-framed 5x7s. These sizes should accommodate collectors at both ends of the spectrum - those looking for something big to go over the couch and also those looking to fill nooks and crannies in the hallway. (The little ones would make a nice grouping over the couch, too!) Windrush represents me exclusively in northern Arizona at 411 Highway 179 in the Garland Building, which is at the foot of Schnebly Hill Road. You can visit them online at www.windrushgallery.net or call them at 1-800-323-0115.

I'm proud to announce that I've been invited back to the Sedona Plein Air Festival this fall. This makes my fifth year participating. I'm looking forward to it, as always. This year, the festival runs October 23-20. For more, visit www.sedonapleinairfestival.com.

For those of you looking for a late-winter or early-spring workshop, I still have spaces in the Paint Sedona mentoring workshops. These are for the intermediate or advanced outdoor painter. If you want to bring your painting skills to the next level and to do it in a beautiful place, give me a call. Don't forget that the price includes six nights lodging and two meals a day. And as I mentioned in my last newsletter, we have a deal. If you bring a friend and stay in separate rooms, you each can take $100 off the fee. Normally, it's $1000 each, but with this "two-fer" deal, it'll only cost you $900! Some of you have asked about attending as day students, and yes, you can attend the week for $300. For more, visit www.paintsedona.com or contact me directly.

If you're new to pastels or would like to try them for the first time, I'm teaching a 6-session Introduction to Pastel class for the Sedona Arts Center. This is a studio class, so if you don't like the thought of painting outside, this is the one for you! From February 20 to March 27, we'll meet Saturday afternoons from 2 to 5. Cost of the workshop is $162 for SAC members, $180 for non-members. For details and to register online, visit http://activenet13.active.com/sedonaartscenter/servlet/adet.sdi?activity_id=133&show_all=&pagenum=1&paid=.

A second workshop I'm teaching through the Sedona Arts Center is a field expedition to Marble Canyon, on the Upper Colorado River. This exciting adventure includes four days painting on the rim plus a one-day boat trip (no white water, promise!). Lodging, breakfast and dinner are included in the $1400 fee. This will be a workshop taught jointly with painter David Haskell. I'll be teaching pastel and David will be teaching oil. For details and to register online, visit http://activenet13.active.com/sedonaartscenter/servlet/adet.sdi?activity_id=24&show_all=&pagenum=2&paid=

After Sedona, I have many workshops coming up for painters of every level. Locations include: Utah, Illinois, Indiana, Vermont, New Hampshire, Texas, Maine and, of course, Campobello Island. Following this letter is a complete list of my 2010 workshops.

Finally, don't forget that I have several publications out now. Two books, two DVDS, a portfolio and a calendar. You can find out more about these at my website at http://www.michaelchesleyjohnson.com/html/book.htm.

Have a great winter, and I hope to see you soon!

Michael

Prepare for Plein Air: Not sure how to go about painting outside? Check out my online course! Great for beginners. Visit www.PrepareForPleinAir.com

2010 Workshops

  • January, February, March: ARIZONA, Sedona - All media. Weeklong, half-day mentoring workshops following the Campobello Island model - Price $1000. Intermediate/Advanced students only with plein air experience. See www.PaintSedona.com for details. (And don't forget our "two-fer" deal as noted above!)
  • February 20-March 27: ARIZONA, Sedona. Weekly studio pastel class through the Sedona Arts Center. Meets 6 Saturdays. Price: $162 SAC members, $180 non-members. Contact: Sedona Art Center, 1-888-954-4442, www.sedonaartscenter.org.
  • April 12-16: UTAH, Ivins - Oil or pastel. Join Michael in the art colony of Coyote Gulch at Blue Raven Studio (www.blueravenartstudio.com) for a week of plein air painting. Beautiful Utah scenery including Snow Canyon and Zion National Park. Price: $350. Contact: Kathy Heiner, 435-674-7425, glasslady53@msn.com
  • April 19-23: ARIZONA, Upper Colorado River (Marble Canyon) - Oil or pastel, Joint workshop with oil painter David Haskell, painting from the rim of the Canyon plus a boat trip! Michael will do pastel; David will do oil. Price: $1400. Contact: Sedona Art Center, 1-888-954-4442, www.sedonaartscenter.org.
  • April 29-May 1: ILLINOIS, Springfield - Pastel only. Join Michael for a three-day outdoor painting workshop in Abe Lincoln's hometown with the Illinois Prairie Pastel Society. Scenery includes the Lincoln Home National Historic Site. Price: $250 IPPS members, $300 non-members. Contact: George King, 217-483-9030, geezer222@comcast.net FULL- Waiting List
  • May 3-5: INDIANA, Valparaiso - Oil & Pastel. Join Michael for a three-day workshop at The Art Barn School of Art. Price: TBA includes lunch. Contact: ArtBarnIN@AOL.com, 219-462-9009, www.artbarnin.com
  • May 8-9: VERMONT, Montpelier - Pastel only. Sponsored by the Vermont Pastel Society. Price: $170. Contact: Michael Chesley Johnson, 575-267-2450, mcj@sff.net
  • June 23-25: NEW BRUNSWICK, Saint John - Oil & Pastel. Sponsored by the Saint John Arts Centre. Price: CA$180. Contact: Saint John Arts Centre, 506- 633-4870, www.saintjohnartscentre.com, info@saintjohnartscentre.com
  • June-mid-September: CAMPOBELLO ISLAND, New Brunswick, Canada - All media. Weeklong, half-day plein air workshops for all levels (students need some prior painting experience.) Paint half the day, explore the island the rest! $300/week. (Deal! Bring a friend, and get $50 off your tuition.) Contact: Michael Chesley Johnson, 575-267-2450, mcj@sff.net. See website for full list of weeks available - www.MichaelChesleyJohnson.com.
  • August 9-13: NEW BRUNSWICK, St Andrews - Oil & Pastel. Sponsored by Sunbury Shores Arts & Nature Centre. Price: TBA. Contact: Sunbury Shores Art & Nature Centre, www.sunburyshores.org, 506-529-3386, info@sunburyshores.org
  • September 22-25: NEW HAMPSHIRE, Goffstown - Oil or pastel. NOTE: This is a Wednesday-Saturday, 4-day workshop. Price: $290 members. Contact: New Hampshire Plein Air, Sharon Allen at msjallen@comcast.net.
  • September 27-October 1: MAINE, Acadia National Park. Oil or pastel. Michael's sixth year teaching in Acadia for the Acadia Workshop Center! Price: $550. Contact: Gail Ribas, 207-460-4119, info@acadiaworkshopcenter.com.
  • October 18--20: TEXAS, Waxahachie. Oil only. Join Michael for three days of autumn in northern Texas. Price: TBA. Contact: TBA
  • November 29-December 3: TEXAS, New Braunfels. Oil or pastel. Join Michael for a week of painting in beautiful Texas "Hill Country." Price: $345. Contact: Mary McIntosh, 1863farmroad@sbcglobal.net, 830-625-0132
Monday, January 25, 2010

Painting Snow

"Snow on Munds" - 12x9 - contact Michael

When someone talks about painting snow, ask what kind of snow he's talking about. There's snow that you have to wade into up to your thighs to paint, and then there's snow you can see comfortably from some warm, sunny place. After all the snowfall we had on the Mogollon Rim this past week, the weather hasn't warmed up much at the higher elevations, and, I've heard, the road up through the canyon is still iffy. But I wanted to paint snow, so I found the perfect spot: the parking lot of the Sedona Arts Center.

SAC has a great view of Munds Mountain and the surrounding hills. In the early morning, the slopes are in shadow, and it's not until mid-morning that the sun comes around and lights up the rocks. I've painted that view several times over the years, sometimes as demonstrations, but other times just because I like it. (By the way, through SAC I'm teaching an Intro to Pastel class starting in February, and a field expedition with David Haskell to Marble Canyon in April.)

Yesterday, I arrived at the parking lot when it was still only 30 degrees. I had to take a walk first to warm up, but the sun soon got bright and warm. I set up and painted for about an hour. I was almost hot by the time I finished!

There was a great deal of both "warm" and "cool" in the shadows of the mountain. Blue skylight bounced down into the shadows, but then, so did a warmer light, which bounced in from the surrounding sunlit hills. As much as I like the idea of putting down a stroke and letting it stay, I did a lot of massaging of the paint here, daubing in warm color, going over it with cool color, and then going back over with warm color again. If you look hard enough, you can probably see me thinking out loud in paint.

I also wanted to include this small sketch I did the day before, when snow squalls were still sweeping through Sedona. This is a squall over Thunder Mountain, painted from the Cultural Park. You can see the "Coffeepot" rocks to the right of Thunder Mountain.

"Squall over Thunder Mountain" - 5x7, oil contact Michael

Saturday, January 23, 2010

Sketchiness


"Cathedral Vista" 4x11, pastel - contact Michael

Those of you watching the national news last night may have seen footage of the floods in Phoenix that wiped out whole towns and buried pickup trucks. If you've been following me on Facebook, you've heard about our own floods here in Sedona because of Oak Creek. We got lucky, and the predicted devastating floods never quite happened. We had high water, and it did hit the flood stage, but other than some road damage, we all survived. This is thanks to a lull in the heavy rain and the snow level, which dropped in the night. I posted a video on Youtube where you can see Oak Creek, just a five-minute walk from here, going through its paces:

http://www.youtube.com/watch?v=B4KbuvbjhxQ

Because we were still under a winter storm watch yesterday, we stayed in to work from photos and reference sketches. I've wanted to paint a view of the mountains from up the road for some time now. This is a view that is fantastic in evening light, a sweeping panorama of Cathedral Rock, Courthouse Butte and Munds Mountain. We took the opportunity to paint this, using a complementary underpainting. With this kind of underpainting, you must leave some of it showing through the final layers for it to be effective. It has a somewhat sketchy appearance, but I like it - I didn't want to polish it and spoil the brilliant vibrancy of complements. This vibrancy is hard to do with oil, which is why I selected pastel. (I've kept this image at full-size; click on it to see it.)

When the Impressionists first landed on the scene, critics denounced them for the "sketchiness" of their paintings. For many years, the critics, as well as the buying public, had been praising paintings made in the academic method. This prejudice blinded them to the beauty that occurs when the maker's process remains visible. Academic painting consists of a product with no visible brushstrokes; every trace of the painter's process is polished away. Sketchiness happens when the brushstrokes aren't smoothed down or when some of the underpainting or even the unpainted ground can be seen.

There is, of course, sketchiness - and then there's sloppiness. With sketchiness, the artist consciously stops at a certain point, knowing that his visible strokes enhance the work. With sloppiness, the artist doesn't care, and if he stops, it is out of laziness. Or, if he doesn't understand that there is beauty in the process, he polishes until he has mud. It would have been easy, I think, to take this little piece to mud.

Friday, January 22, 2010

Painting the Long View

"Secret Canyon I" 5x7, oil - contact Michael

"Secret Canyon II" 5x7, oil - contact Michael

"Sugar Loaf" 5x7, oil - contact Michael

As you remember, I did a few diptychs recently in an effort to catch some of the grandness of the Sedona panorama. But in all that beauty, sometimes one particular distant mountain would catch my eye. So in addition to the diptychs, I did a few paintings of these long views.

I forget which painter it was, and a quick Google search didn't bring up the name, but I remember reading about one who painted views through a spyglass. The spyglass gives you a monocular view rather than the binocular view we're so used to, which helps to flatten the image and reduce the sense of distance between the nearest and most distant objects. (I may be thinking of Cezanne or one of the other post-Impressionist image-flatteners.) Also, the view tends to be more high-key with almost no dark accents but lots of greyed colors. Shapes are simplified and often modelled only by mid-tone and highlight.

The three paintings above are my long views. As a comparison, I also offer the image below of a landmark that was much closer to us. You'll note the Chimney is modelled with three values (highlight, mid-value, dark) and there is some good dark in the cast shadow.

"Chimney" 5x7, oil - contact Michael

Wednesday, January 20, 2010

More on Diptychs & Changing Light

"Red Rock 3" 5x7, pastel - contact Michael

"Red Rock 4" 5x7, pastel - contact Michael


What was a hard rain for us last night was heavy snow for the Mogollon Rim just north of town. Fortunately, the clouds broke early in the morning, and we were able to go down to Crescent Moon for some good painting. The creek is up - the stepping stones at Red Rock Crossing are now under fast-moving water - but the air is full of the smell of sycamores.

At the end of the park closest to Cathedral Rock, there's a great view of a meadow with cliffs behind it. It was a great spot to practice "in place" painting. Although we each did two paintings, we didn't move our easels except to keep the painting surface in shade as the sun moved. In my first painting, you can see the Madonna and Nuns, over near the Chapel of the Holy Cross, and in the second, the shoulder of Cathedral Rock. I put together a single image showing you the distance between the two scenes. You can get a good idea of the panorama.

The weather changed rapidly during our session. Clouds were the rule in the first one; sun in the second. Still, these two paintings look very similar in tone and color, mostly because in each case the rocks are back-lit with deep shadows and rim lighting. Unlike my previous diptych, in which I blocked in both panels at the same time, here I did each independently, making sure I had a "clean slate" for the second one, so to speak. I even returned my pastel selections for the first back into the box, and chose them "fresh" from the box for the second. (Keeping the same palette for each insures a harmony in color, but I wanted to make different choices for the second if necessary, and the easiest way to do that is to start empty-handed.)

The first one is on Wallis sanded paper, the Belgian Mist color. The second is some unknown brand, one of many sample sheets I have. I used an alcohol wash on this one to get the color started.

Tuesday, January 19, 2010

Working with Changing Light

Red Rock I, 5x7, pastel - contact Michael


Red Rock II, 5x7, pastel - contact Michael

Monet was famous for toting out to his painting spot several large canvases at once. Each canvas had been started under different weather or lighting conditions. When the full-sun, blue-sky moment came, he'd pull out the full-sun, blue-sky canvas and work on that a little while. When the moment changed to a partly-cloudy, hazy-sky one, he'd pull out the partly-cloudy, hazy-sky canvas and work on that.

The method was all right for Monet, who had a retinue of children following him. (I've heard different stories, some saying these were his own children, others that they were kids from the neighborhood. Lucky kids.) But I like a solitary adventure and prefer to keep things simpler. When I'm expecting variable conditions, I'll work on a succession of small pieces, completing each in turn before starting another. I can work pretty fast in pastel. I only need ten minutes or so when sketching a 5x7.

We are certainly having variable conditions this week. The jet stream has finally returned, slicing south and bringing a series of storms. Last night's rain ended around dawn, but we had some beautiful clouds for awhile, and then, suddenly, blue sky. I did two quick, 5x7 pastel sketches to capture the change. They are in order above. About ten minutes separates them.

For these, I worked directly are on white Wallis sanded paper, using a foam brush to cover the white with pastel during the block-in before finishing. I used both Polychromos and Mount Vision pastels.

Later this week, we're expecting snow! I can't wait to capture a snow scene.

Monday, January 18, 2010

How to Paint a Diptych

"Coffee Pot Rock and Beyond"
7x10, diptych, oil/panel
- SOLD

Sometimes, we see a panoramic scene that would make a stunning landscape, but the scene is so grand and sweeping that we don't have the energy to do the whole thing at once. At such times, you might consider creating a diptych - a two-part painting. Each part can be done separately, just so long as together they depict the same lighting and weather conditions. Another "rule" of the diptych is that not only must it be well-composed, but so do each of its parts. Each part should be its own, complete painting.

The other day, we headed over to the end of Andante Street, where there is a trail that wanders up to the Chimney formation and Thunder Mountain and beyond. From the trailhead, you get some of those grand, sweeping views. I hadn't intended to do a diptych, but I had a 12x16 panel that I'd marked off into four 5x7 rectangles with masking tape. I decided to use two of those rectangles for a diptych.

I didn't paint each part separately. Instead, when I sketched in the large masses, I let my brush slide right over the masking tape from one part to the next. I wanted to make sure the two images fit together properly. Next, I blocked in the shadows in both parts. My reason for this was that the shadows were changing quickly and I wanted to keep my lighting consistent in each. But once I'd blocked in my shadows, I knew I could take my time. I worked on the left half until it was complete, and then I moved on to the right half.

You can also do triptychs and, I suppose, any number of images that are linked in this way. The more parts you have, of course, the longer it will take. But if you block in the shadows throughout right from the start, you'll avoid having inconsistent lighting.

Below is a closeup of each panel.


Sunday, January 17, 2010

Absorbent Ground for Oil

"Boynton Canyon Cliffs"
9x12, oil


We drove out to Boynton Canyon this week. Boynton Canyon is not only home to the Enchantment Resort but also a very popular spot for vortex enthusiasts. For those of you who don't know what a vortex is, it's a New Age concept. A vortex is a geographical location that puts off energy vibrations. According to one source, the Boynton Canyon vortex strengthens the yin/yang balance.

I don't know much about yin/yang and even less about vortexes, but I do know Boynton Canyon gets a lot of hikers and vortex tourists. We arrived early, long before the trailhead parking lot filled. Since we made sure to set up far away from the trailhead, no one bothered us. From this parking lot, there are good views of the cliffs that tower over the canyon. Little puffy clouds drifted in over the cliff tops, making for a pretty scene.

I went to work in my usual manner on a 9x12 I had grabbed out of my stack of Ampersand Gessobord. However, with my very first brush stroke, which consisted of some dark paint thinned just the tiniest bit with Gamsol, I noted something was wrong. The paint seemed to dry almost instantly, giving a broken stroke. I added more Gamsol, but it happened again. "Gosh," I remarked, "is it that warm out here?" But it was only 50 degrees. My student suggested maybe the wind was drying out the paint, but we were on the leeward side of a big juniper. Still, the paint was acting almost like an alkyd on a hot day.

Then it hit me. What the heck was I painting on? I put down my brush and flipped over the panel. The stamp read "Claybord." And that solved it. I'd bought a few panels of Claybord to experiment with later this winter. But I had wanted it to be mentally prepared for the experiment! Once I'd figured out my mistake, though, I began painting with gusto. I enjoyed the way I could lay down a stroke and almost immediately lay down another on top of it without getting mud. Also, scumbling was a snap. You can't do that with wet oil paint.

I've included a detail shot of the painting below so you can see the strokes.

Thursday, January 14, 2010

Put Down a Stroke and Let It Stay: Masterful Improv


"Red Rock Rush"
5x7, oil - contact Michael


If you watch a master paint, it's like listening to a jazz trumpeter skilled at improv. The musician knows his notes and fingering well enough so that even if he blows a rare, false note, he can incorporate it into the flow. It'll sound as if he'd intended it all along. And sometimes, that false note can even lead to a passage of virtuosic genius.

A master painter is like that. He can blow a note and let it stay. That is, he doesn't fuss with his strokes. He doesn't massage a little blue into it to make it cooler. He doesn't blend the edges to make it not stand out so much. At the very most, he'll add a second stroke beside that one to modify an edge or to cause an apparent color change through simultaneous contrast. When he's done, the painting has a crisp immediacy just like the trumpeter's improv.

How can you become so accomplished that you can put down a stroke and let it stay? Practice. You've got to be as comfortable with your instruments as the trumpeter is with his. You must learn that you can get a certain stroke if you hold the brush one way, and a different stroke if you hold it another way. You must learn that when you mix this blue with that yellow, you'll get a particular shade of green, and when you put it down next to a certain red, it'll give you a particular effect. But you've got to know all these things not just in your brain but in your hand and arm as well. And that takes - practice.

The master painter does has an advantage over the trumpeter - he can take back a note, if he has to. A stroke can be scraped and put down right the second time. Since most master painters work in private, I'd bet this happens more than we might think.

What are your thoughts on this?

Lately, I've been making an effort to leave every brush stroke alone. It's tempting to fuss with a stroke, but I find if I consciously aim to mix the right color and put it in the right spot, the painting goes a whole lot better.

This small painting I did at Red Rock Crossing was painted this way. It was an overcast day and the light wasn't changing much, so I had plenty of time to consider each stroke.

Monday, January 11, 2010

Gesture Drawing & Trees

In my last post on painting the Arizona sycamore, I mentioned that I start with a "gesture drawing," just as I do with the figure. This sketch, whether with tree or figure, is intended to capture the subject's graceful curves and dynamic quality. Some of you asked to see what this sketch looked like and wanted a demo. So, we went back down to Crescent Moon Ranch to do some more trees.

This time, I focussed on the cottonwood tree. Although it doesn't have quite the lyrical motion of the sycamore, it's a beautiful tree, too. Massive and gnarled, it has its own dance. The shape of it is particularly beautiful this time of year when the leaves are gone.

Below is the demo (complete with lens distortion, alas.) I started with some thin paint and a small brush to draw the gesture, and then I moved to a larger brush loaded with grey to block in the main trunk and branches. From there, I did the background, sky and foreground, and then proceeded to work more on the tree. I look forward to hearing your comments.

"Cottonwood," 9x12, oil/panel


Friday, January 8, 2010

Sycamores & Greys

"Sycamore Grove I" 12x16, oil/panel

"Sycamore Grove II" 12x16, oil/panel

both available through Windrush Gallery
800-323-0115 - info@windrushgallery.net

This week in our workshop, we're addressing motifs. We spend two days on a different subject. Today, we finished a series on a particularly beautiful species of tree - the Arizona Sycamore.

Tall with graceful curves that could serve as a model for a roller coaster ride, the sycamore is full of chameleon color. Sometimes they are a creamy yellow, at other times a cool dusky green, and in the shadows, a deep earthy red. If we have rain, the bark can even turn an intense lime-green! But typically, they are full of grey. Yellow-greys, green-greys, red-greys - you name it. It helps to have a puddle of plain old grey on the palette to which you can add color to "push" it toward a particular color family. (Gamblin's Portland Grey Medium is perfect for this.)

These are two paintings I did. The first, done at Red Rock State Park, was on what I call a "breaking overcast" day with mostly grey cloud and spots of sun poking through. The second, done at Crescent Moon Ranch, was an intensely sunny day with deep blue skies. The trees in each case are very different, but they're still the Arizona Sycamore.

I start these trees the way I do the figure, with a gesture sketch. I take a small brush with thinned paint and sketch what one might call the tree's "line of action" as well as the lines of the major branches. Once I'm satisfied with the gesture, I'll take a big brush with opaque, neutral grey paint and trace over them, trying to get the width of the trees and branches right. Next, I put in the dark shadows. I finish by modelling the sunlit areas with different greys.

Tuesday, January 5, 2010

Averted Vision

"Madonna & Nuns" - Sketch
6x8, oil/paper - contact Michael

We went out this morning to what the locals call the "landing pad" - a flat-top outcrop overlooking Crescent Moon Ranch. From here, we could see all the way past Cathedral Rock to the "Madonna and Nuns" formation near the Chapel of the Holy Cross.

From our perch, the distant formation was full of beautiful, cool blue and violet shadows and hints of golden rim light. Using the technique of averted vision, I was able to get a true sense of how rich these shadows were. Averted vision involves letting your eye dart over the scene without resting in any one spot, and while doing so, paying attention to what colors you see with peripheral vision. I find it particularly useful in situations like this, in which simply staring at the color will make it look duller than it really is. (Staring provokes a complementary response in the eye, and this complementary color seems to grey the field.)

I did a quick sketch, making sure to keep the color rich to evoke a sense of the majestic light. I did use a bit of Chromatic Black to keep the shadows from looking garish. By the way, this is painted on cartón board from Judson's Art Outfitters . I really like the warm color of this board, especially when painting such a cool scene as this.

Saturday, January 2, 2010

Sense of Scale

"Thunder Mountain Outcrop, Overcast" - sketch
12x9, pastel


When you hike in Sedona, you'll experience a strange but rather common experience. You'll see an interesting rock formation that looks like a five-minute walk, but it'll end up being an hour's journey. Or, just as likely, a formation that looks pretty far off will be only a short hike! As with much of the arid Southwest, illusions with distance result not only from the clear air but mostly from the lack of a scale reference.

A scale reference can be a human figure, a house or even bunches of prickly pear diminishing into the distance. Anything that has a size that we are familiar with will work. In my own paintings, I've used all the tricks - even a pair of ravens whirling around a summit. It's important to let the viewer know how big (or how small) a rock formation is. Just drawing it accurately isn't enough.

In the accompanying pastel sketch, I used juniper bushes. Around here, they're all around the same size - about the height of a human. But not everyone is familiar with juniper bushes, and I have seen some exceptions which are twice as high as me. To make the sense of scale even more successful, I might have put in some prickly pears, the pads of which would become smaller and smaller as they got closer to the rock. Or maybe even a rock climber, rappelling from the summit!

By the way, due to technical difficulties, I wasn't able to use my tripod for this sketch. I ended up holding the board in one hand while sketching with the other. Even with a minimum of equipment, you can get good results.